ERP-RS01-5.10.0.1
Entersoft Business Suite®
New features and extensions
Περιεχόμενα
Liquidity
Payment orders preparation
The Payment orders preparation process has been enriched. Now, using it the user can also manage advance payments for orders. The same way as in the Planning of payments process – where this feature was offered in version 5.9.0.0 – starting from this version onwards, in the 3 steps of Payment orders preparation process the user can also view the Supplier/creditor orders, depending on the value of the criterion “Entry type”.
The user is thus able to add advance payments for those, which must first be approved and then, in the last step, it must result in the appropriate transaction document (payment document).
- Initially, through the 1st step of the Payment orders preparation screen, it is possible to view, using the “Entry type” criterion, the invoices (confirmed forecasts) and the orders (scheduled outflows) that have been made and have not yet been paid (have not been converted into invoices).
The new criterion is displayed in the parameter group “All” and is called “Entry type”. The available values are:
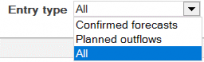 Confirmed forecasts the supplier/creditor invoices (default value)
- Planned outflows supplier/creditor orders
- All

- For every trade account there are 2 rows - as long as there’s documents in both the invoice and order categories - and each row compiles all the documents of each case. In the 1st row and column “Amount due”, the user can view the total outstanding invoices and in the 2nd row, the total open orders. The order line will be displayed in a distinct green color.
At the 2nd level - just as with open invoices - you can see the orders with their open amount in detail, the sum of which appears cumulatively at the 1st level under "Amount due".
After the payment amount has been entered and with the use of the Next, Payment order documents are created (type PSD)

- In the 2ndstep, “Payment orders approval”, by using criterion "Entry type" again, the user can view the PSDs that have resulted from invoices and/or orders. Selecting them and completion the action signals their approval.
- Finally, in the 3rd step, Approved payment orders are converted into Transaction documents. In this case too, as in the Planning of payments, for the documents that will result from the payment orders, the document type is specified in company parameter “Payment planning process =>16. Doc type for automatic creation of deposits”.
Miscellaneous improvements
- On the “Documents” page in the Trade account contracts, an improvement was made so that the user can view the sales-expense documents for the cases of supplier contracts.
- In the "Data type history log" view, for better management of data packets, parameter "Consumption” was added, with available values: All, No, Yes.
- For VAT Category 4%, a column was added in view "Report of X and Z for comparison with X and Z of cash register”.
- In the customer search, in Retail, the customer's mobile number has been added to the results.
- The 2-CARD property plan has been augmented. Fixed an issue that would restore the line type of the liquidity account to value "Actual”, when the liquidity account is not related to a card transaction.
- Improved the search time when searching a customer by their phone number, in the <Select customer> action of retail.
- Support for saving relevant documents in vouchers.
Horizontal functionality
Image export
In the view export or the Excel bit, it's now possible to properly export photos. For this reason, in the “Advanced data export” dialog that appears on the views and Bits toolbar, the "Export images” flag was added, which is the default only in the case of export into Excel. If, for example, in product view: “Item catalogue with photos”, the user selects export of the item photos, the result will be as follows:

In the case of a large volume of photo data, it is recommended to de-select the flag, to avoid long delays and a time burden in capturing the excel.
Improved the "Advanced data export" screen used in views and Bits to export results in various formats (xls, xml, ascii, etc.), to give it the look & feel of series 5.
Email delivery
In this version, the necessary implementation was made to support email delivery via Gmail through the application, after changes made by Google in the certification method.
In particular, the classic authentication by username and password has ceased to operate and now, following modern certification methods, a dialog with multi-factor authentication (MFA) is displayed.
More specifically, the following changes have been made:
A. Added company parameter ES_MAIL_CLIENT_info_FILE
B. In the Communication Profile ClientInfoFile field has been added
C. In the options of field Delivery method (Send_Mail_Service) of the Communication Profile, just like email delivery via Office 365, two new delivery methods have been added, via Gmail (Server) and Gmail (Client).

Gmail (Server)
A new email delivery method via Gmail. It utilizes the open-source MimeKit and Google.Apis libraries that run on .NET Framework 4.8. The email is sent directly via the Gmail API. It is mainly used for server-side deliveries where UI usage and thus dialog automation is not permitted . However, it may also be used in deliveries via client. Implemented 2-legged OAuth flow (2LA) for server-to-server communication.
Google’s requirements to support this flow are as follows:
Google Workspace
App with access to Gmail API
Service account with domain-wide access for the app
Client secret for the app
The app can send emails as a service. The user used for the delivery is the sender of the email. This means that an adapter can send with any user, as long as the appropriate permissions have been given to the app by the admin.
Be cautious when using client-side. The app has the permission to send via any user, which raises security issues. It should be used only in server-side or highly controlled environments.
Gmail (Client)
A new email delivery method via Gmail. It utilizes the open-source MimeKit and Google.Apis libraries that run on .NET Framework 4.8. The email is sent directly via the Gmail API. It is only used for deliveries from clients that allow the use of UI and thus the display of an authorization dialog. Using it in the EAS with an exception and an appropriate deterrent message is not allowed. However, the caller should make sure they can display UI.
Implemented 3-legged OAuth flow (3LA) for client-to-server communication. Requires a specified tenant id and client id. The certification process will display an Oauth2/MFA dialog to the user to, log into their company account.
Google’s requirements to support this flow are as follows:
- Google Workspace
- App with access to Gmail API
- Client secret for the app
The app sends emails on behalf of the logged-in user, who is also the sender of the email.
App - Create
Assuming that there is already an active Google Workspace:
Go to Google Cloud Console and select or create a new Project.
Create a new Application (app) and set up the consent screen / branding. Pay attention to the Audience type. You will be asked to select the accounts your app is addressing.
- If you select External, then the app must pass a review from Google, as it addresses at a wide audience and accounts beyond the company Workspace.
- If you select Internal, then you do not need a review, as it addresses accounts that belong to the company Workspace. It’s you who takes responsibility for the security. (default)
If you do not have a workspace and would like to use only the client-side delivery, then you can specify audience type “External” and publish status “Testing”. In this way, the app is in testing mode and does not need review. However, there are some limitations. For example, you have to indicate which users will use the app. In addition, there is a limit to the number of emails sent.
Then, you need to activate the Gmail API for the app, in order to give access to gmail services. In addition, you need to set the scope “gmail.send” and “gmail.readonly” for the app (data access).
App – Settings for client-side delivery
Create an “OAuth 2.0 Client ID” for the app and select application type “Desktop App.” The process will create the Client ID and Client Secret needed to implement 3LA.
At this point, you can choose to save the elements to a json file. Place this file in a EBS directory synchronized to the terminals. Then, enter the relative path in the ClientInfoFile field of the communication profile, or in the corresponding company parameter, e.g. CSConfig\GmailClientInfo.json.
Alternatively, you can copy/paste the client id and secret in the corresponding fields of the communication profile, or in the respective company parameters.
App – Settings for server-side delivery
Create a Service Account. Write down the OAuth Client ID generated from the process, as you will need it below.
Then, create a Key for the Service Account. Save the Service Account client information to a json file. Then, enter the relative path in the ClientInfoFile field of the communication profile, or in the corresponding company parameter, e.g. ESNoSync\GmailServiceAccountInfo.json.
Using the Google Admin Console, set up the “Domain-wide Access Delegation” for the app. Use the OAuth Client ID provided to you when creating the Service account. Finally, authorize score https://mail.google.com/.
Attention: Due to the domain-wide access deletion, the service account has permission to send emails via any account. Be very careful to avoid downloading the info json when synchronizing terminals. Make sure that you place it in a server folder that is not synchronized, like ESNoSync.
