MOBILE - MedRep User Guide EN
Περιεχόμενα
Introduction
The purpose of this manual is to provide basic information regarding the use & configuration of Entersoft Mobile Service application (ESMedRep). In brief, the individual objectives are:
The familiarization of the user with the ESMedRep work environment
The provision of useful information, regarding fundamental daily tasks, to the ESMedRep user
The guidance of the system administrator in configuration issues of the Entersoft Business Suite (EBS) application that are related directly with the operation of the ESMedRep application
The Prerequisites for the use of the ESMedRep application and of this manual are:
- the knowledge of all necessary setup & adjustment actions for IIS & Application server (Entersoft Business Suite version 4.10.0.0 or later+ Last Solution MedRep)
- the knowledge of the environment & usage of each mobile device
- the right setting of all required equipment
Symbols in use
![C:\Documents and Settings\mat.ES-ENTERSOFT\Local Settings\Temporary Internet Files\Content.IE5\0UYK37R9\MC900433941[1].png](/wiki/%CE%91%CF%81%CF%87%CE%B5%CE%AF%CE%BF:MOB-MedRepUserGuide_EN-image4.png)
|
Entersoft Business Suite application |
|---|---|

|
A connection with back-office is required |

|
An Internet connection is required |
Work environment
This section refers to the main elements of the ESMobile application work environment. Firstly, a short description of the main workplace is given, while later on the common characteristics of display & investigation screens are provided.
Calendar
When entering the ESMobile application, the workspace is automatically occupied by a calendar screen where the scheduled tasks are shown in the form of list or tags but also as points on the map. Firstly, the tasks of the current date appear though, through the keys “Week” & “Month”, the option of viewing the current week-month activities is given respectively. Pressing button “Today”, results to direct return to current date. From the calendar screen, via the main menu, the navigation to other application screens is carried out.


Investigation screen
The investigation screens show the entries of an entity in the form of a list. The upper part of the screen is occupied by the area where the main & additional search-filtering criteria are defined (search panel).
When focusing on a list entry the transition to the dashboard or data entry screen, of the specific entry, occurs.
Dashboard screen
A dashboard screen enables the ergonomic display of information and actions available for the selected entry. It can show data from the current entry but also from other, connected to current, entities. Data are displayed for information purposes only, meaning that they cannot be edited by the user. The upper area of the screen displays the individual tab pages and the back button. At the lower part of the screen, the buttons for several execution actions are available.

Data entry screen
Data entry screens are used for editing or reviewing the data of a specific entry. The user interface of data entry screens differs depending on the entity it may concern.

Main entities
In this section the main entities are described, meaning the persons (organizations & professionals) and the items that are necessary for the execution of the ESMedRep application several processes. Note that, the full administration of the main entities takes place in back-office and any data changes, form the mobile user, is prohibited.
Customers list
The ESMedRep application customers lists refers to the health organizations & professionals managed by the mobile user, as well as the relevant organization-professional business affiliations.
Organizations
Access to the organizations list is provided via the relevant main menu entry. By selecting this entry, the complete organizations list appears, ordered alphabetically by name. The search of a specific organization can be conducted either by using his name or by using other identification data (address or category). When focusing on a specific organization, further information referring to its structure (working places & professionals) and its activity (activities history) is provided, while at the same time, the option for direct execution of several actions (e.g. add new appointment or photo shooting) is given. Finally, via buttons  “Attachments” &
  “Dropbox”, the ability to display the attached documents screen & go to Dropbox is respectively given.

![C:\Users\smp\AppData\Local\Microsoft\Windows\Temporary Internet Files\Content.IE5\5ERD3D13\MCj04421290000[1].png](/wiki/%CE%91%CF%81%CF%87%CE%B5%CE%AF%CE%BF:MOB-MedRepUserGuide_EN-image26.png) Note that…
Note that…
Based on the default configuration, available to the device are the organizations assigned, via territory hierarchy, to the mobile’s resource-user position.
In section “Professionals-Action points, for informative reasons, the full list of the organization’s action points is provided while marking their status as
 Visit enabled or
  Visit disabled.
For further information regarding person entity configuration, see section CRM application’s configuration/ Main entities/ Organizations & Professionals.
Professionals
Access to the professionals list is provided via the relevant main menu entry. By selecting this entry, the complete professionals list appears, ordered alphabetically by name. The search of a specific professional can be conducted either by using his name or by using other identification data (telephone, category, specialty etc.) while to distinguish professionals based on ABC classification, a specific color marking is used ( A
A  B
B  C). When focusing on a specific professional, further information referring to its characteristics (specialties & interests) and its activity (scheduled actions or activities history) is provided, while at the same time, the option for direct execution of several actions (e.g. conference registration or photo shooting) is given. Finally, via buttons “Attachments” & “Dropbox”, the ability to display the attached documents screen & go to Dropbox is respectively given.

Note that…
Based on the default configuration, available to the device are the professionals assigned, via territory hierarchy, to the mobile’s resource-user position.
In section “Organizations-Action points, for informative reasons, the full list of the professional’s action points is provided while marking their status as
Visit enabled or Visit disabled.
Action points
Access to the action points list is provided via the relevant main menu entry. By selecting this entry, the complete action points list appears, ordered alphabetically by organization-professional. The search of a specific point can be conducted either by using the professional’s name or by using other organization-professional identification data (address, category, specialty etc.) while to distinguish action points based on ABC action point’s classification, a specific color marking is used (A B C). When focusing on a specific action point, further information referring either to the professional (communication data, specialties etc.) or to the action point (brochure & activities history) is provided, while at the same time, the option of adding new visits to the selected action point, is given.
Note that…
Based on the default configuration, available to the device are the action points assigned, via territory hierarchy, to the mobile’s resource-user position. Also available to the device, only for informative reasons, are all “visit disabled” action points related to mobile user’s customers list. These points are excluded from the action points list but there is an ability to review them through organization-professional dashboard screens.

Brochures
The ESMedRep application’s brochures is a guiding tool that facilitates the process of informing health professionals about company’s items catalogue.
Note that…
Based on the default configuration, items available to the device are those that:
Both their grouping factors and the items themselves are characterized as available on mobiles.
Are assigned, via territory hierarchy, to the mobile’s resource-user position
Through the entry “Photos receipt” of the “Sync” menu, the option of downloading -via an online connection to the server- items image files, is provided.
Items catalogue
Access to the Items catalogue is provided via the relevant entry of the main menu (menu: Information/ Brochures). By selecting this entry, the complete list of items appears, ordered alphabetically by item’s description. The search of a specific item can be conducted either by using its code or by using other identification data (description, grouping factors, etc.). When focusing on a specific item, the option of getting further information regarding its additional characteristics (ingredients, indications & contraindications) is provided. Finally, via buttons “Attachments” & “Dropbox”, the ability to display the attached documents screen & go to Dropbox is respectively given.
Furthermore, through the menu entry Items presentation, the option of presenting items catalogue in form of a photo-gallery is provided. By selecting this entry, the complete list of items appears, thought by focusing on a specific grouping factor, the catalogue adjusts accordingly.
Activity journals
The activity journal is a tool that provides the ability to differentiate item brochures based on special characteristic of current action point’s organization (organization’s type) and professional (professional’s specialties).
Activity journal formation
The activity journal formation is implemented in back-office via the task type ACTJ-Activity journal (menu: Pharmaceutical industry/ Activities / Action guides). The activity journal details define the starting date, the associated items-priority (section: Items) and detailed information regarding characteristics the associated persons list (section: Characteristics).
Note that…
Based on the default configuration, available to the device are all activity journals with status active and with dates of effect within the current date.
Activity journal previewing
Access to the Activity journals list is provided via the relevant entry of the main menu (menu: Information/ Brochures). When focusing on a specific activity journal, the option of getting further information regarding its characteristics and items list is provided, while selecting a specific item, the item’s dashboard screen appears.

Visits & Appointments
This section describes the ESMedRep application actions related to managing user’s daily operations as well as the available, for operations execution, tools. The several actions are usually performed form calendar screen while the mobile user has also the ability to perform them from person or action point screens.
Calendar
 The calendar screen displays all scheduled activities (
 -Visits &
  -Appointments) giving at the same time the ability to the mobile user, via button “New”, for bulk visits generation on selected action points. Firstly, the activities of the current week appear though, through the keys “Day” & “Month”, the option of viewing the current day-month activities is given respectively. Pressing button “Today”, results to direct return to current date. Especially in case of “Day” view, the activities are also displayed as points on the map.
“Appointment” type activities refer to organizations, while “Visit” type activities refer to action points. When focusing on a specific activity, regardless of its type, all data required for performing the activity is given while at the same time, further information regarding its person’s activities history is provided. Furthermore, via button  “View”, the task’s data entry screen appears, though via button
  “Actions” the option for direct execution of several actions is given. Finally, via buttons “Attachments” & “Dropbox”, the ability to display the attached documents screen & go to Dropbox is respectively given.
Note that…
Based on the default configuration, available to the device are the pending activities related to mobile user’s customers list referring to the mobile user as the assigned to resource. Also available to the device, only for informative reasons, are all closed activities related to mobile user’s customers list regardless the “assigned to” resource.
Based on the default configuration, available to calendar screen are only open visits & appointments. Differentiation of this setting is provided by setting the mobile parameter “Calendar_show_closed_tasks” to 1-Yes.
 Visit processing

Through  “Start” button of calendar dashboard screen, the update of current visit’s arrival and start date-time is performed and its timing begins. Furthermore, to ensure the time-place accuracy of the visit processing, the user’s position recording is activated. On page “Brochure”, the items related -based on the activity journal- to the current action point, ordered by priority, is provided. To display the items full catalogue, the search panel criterion “Activity journal” should be set to “All”, while the search of a specific item can be conducted either by using its code or by using other identification data (description, grouping factors, etc.)
When focusing on a specific item and by pressing the  “Attachments” button, the ability to display the item’s attached documents screen is given, while by pressing one on the “Response” buttons (
 -Positive,
  -Neutral &
  -Negative), the item & response recording is performed, and the item is simultaneously marked as selected. The ability to modify or delete the item recordings is given only through the visit’s data entry screen. Finally, when the items recording is completed, pressing button
  “Done” results to visit’s timing end with updating its end date-time info and also updating its status as completed.
Appointment processing
 Through “Start” button of calendar dashboard screen, the update of current appointment’s arrival and start date-time is performed and its timing begins. Furthermore, to ensure the time-place accuracy of the appointment processing, the user’s position recording is activated. In section Professionals of page “General”, all professionals related with the appointment’s organization are displayed while in section Resources the company’s resources list is given. By selecting on these lists, the preferable persons, the appointment’s participants are defined. On page “Brochure”, the items full catalogue, ordered by code, is provided. To reduce the full list to the activity journal items, the search panel criterion “Activity journal” should be set to “Yes”, while the search of a specific item can be conducted either by using its code or by using other identification data (description, grouping factors, etc.).
When focusing on a specific item and by pressing the “Attachments” button, the ability to display the item’s attached documents screen is given, while by pressing the  -Select button, the item recording is performed, and the item is simultaneously marked as selected. The ability to modify or delete the item recordings is given only through the appointment’s data entry screen. Finally, when the items recording is completed, pressing button “Done” results to appointment’s timing end with updating its end date-time info and also updating its status as completed.
 Activity reviewing

Pressing the “View” button of calendar dashboard screen, the activity’s data entry screen appears. Page “General” provides the activity’s basic info (organization, address, professional, start & end date-time, status), while in page “Contents” the activity’s items list is displayed. From this page and by using the buttons  “Items list” or
  “Delete” the ability to add or delete an item is provided, though via the “Attachments” button, the ability to display the activity’s attached documents screen is given. Finally, in pages “Professionals” & “Resources”, the relevant participants lists are displayed giving at the same time the ability to add or delete a participant.
 Bulk visits generation

By pressing in calendar screen, the button “New”, either the action points list or the closed visits list is provided. At first, the visits generation data (start date-time, duration & preparation minutes) are defined and then, selecting specific records and pressing the button  “Add”, the relevant visits are generated. To properly place the appointments in calendar screen, both company working hours & holidays and already existing activities {visits or appointments) are taken under consideration.
Attached documents
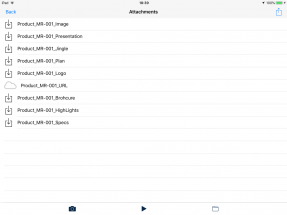
From the attached documents management screen, the ability of downloading attachments from back-office, of attaching files on the device and of previewing the contents of an attachment from the device is provided. The attached documents functionality is available for the entities: Item, Person, Task, Document & Expense list.
 Attachments downloading

Access to the full, regardless entity, attached documents list is provided via the relevant option of “Sync” menu. Furthermore, through button “Attachments” of entity’s dashboard screen e.g. entity Item), the list of all attached documents related to the current record is given. Pressing the “Actions” button of the attached documents screen, regardless the menu option used to activate the screen, the attachments from back-office downloading process is activated. When the downloading process is completed, the icon marking the documents to be downloaded (icon  ) is automatically replaced with an icon related to the type of each document. The icons used to indicate the various document types are:

|
DOC | 
|

|
WAV | |
|---|---|---|---|---|---|

|
XLS | 
|
HTML | 
|
Other |

|
PPT | 
|
JPG or PNG | 
|
Not stored (e.g. URL address) |
File attaching
Using the  or
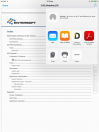
or  buttons on the attached documents screen, the ability to attach image or sound files is given. Alternatively, the ability to attach a file through the context of another application is also provided. In this case, we activate at first the preferable application (e.g. Acrobat application), we focus on the document to be attached and select the option “Open in…” of “Actions” button. Then, by selecting the ESMobile application’s representative icon, a list with the available in ESMobile application entities is displayed. Finally, by focusing on a specific entity, a list of its detailed records is displayed from which we select the record to be related with the attachment file.
 Attachment previewing

By focusing on a specific record of the attached documents management screen, a preview screen, relevant to the document’s type appears. By pressing the “Actions” button of this screen, the ability either to send the document via e-mail or to preview it through the context of another application (e.g. Acrobat application), is provided.
Next visit
Through the entry “Next visit” of the main menu, a phonetic reminding to the mobile user, about next visit’s detail (action point & time), takes place.
Nearby action points
Through the entry “Nearby action points” of the main menu, all action points within a 10 km distance from user’s location are shown in form of a list or points on the map. By editing a preferable distance in field “Radius”, an increase or decrease of the radius is obtained.
 Configuration info
Calendar screen
The ability to configure the calendar screen elements is provided. Specifically, the configurable elements are:
Bulk visits generation screen width, with valid values from 0 to 1, where 1 corresponds to 100% of the screen width (property: VisitPlanTrayWidth)
Time frame pages and map, with the ability to show or hide them (properties: DisableMap, DisableDayTab, DisableWeekTab, DisableMonthTab & DisableListTab
Default page, with options 0-Day, 1-Week, 2-Month & 3-List (property: DefaultTab)
The properties above are declared in a specific file placed in Settings area of the calendar screen form (file: CalendarTaskSettings)
Mobile parameters
- Available to calendar screen are only open visits & appointments. Differentiation of this setting is provided via mobile parameter “Calendar_show_closed_tasks”.
- The definition of company’s working hours, for use in visits bulk generation processes, is performed via the mobile parameters “StartWorkingTime” & “EndWorkingTime”.
- The morning zone of calendar screen is displayed as non-greyed. The morning zone definition time limits is performed via the mobile parameters “MorningZoneStartTime” & “MorningZoneEndTime”.
- The preferable number of days, for allowing interventions in old appointments, is defined in the mobile parameter “App_Days_Edit_Allowed”. By setting the value 0, the check is completely deactivated.
- To activate the bulk visits generation process, the mobile parameter “Appointment_creator_enable” should be set to 1-Yes.
Other activities
This section describes the ESMedRep application actions that are related with supportive and promotional activities. These activities are performed either from calendar screen and within a selected visit or from person screen.
Conferences & Events
The ESMedRep application provides the ability to record the response of the professionals invited at conferences & events organized by the company. The response recording is performed via an Event registration task type and is always based on a predefined professionals list that is formatted in back-office and in the context of a specific conference or event.
![MC900433941[1]](/images/thumb/8/8d/MOB-MedRepUserGuide_EN-image4.png/19px-MOB-MedRepUserGuide_EN-image4.png) Event formation
Event formation
The event formation is implemented in back-office via the task type EVT-Event (menu: Pharmaceutical industry/ Conference mgmt./ Conference generation wizard). The event details define the duration, the place to be conducted (section: Information) and the professionals invited to participate (section: Participants List).
Note that…
Based on the default configuration, available to the device are all events with start date after the current date. Also available to the device, only for informative reasons, are old events with start date within the historical time limits of REG-Event registration task type.
Event response
Access to scheduled events is provided either from calendar screen and within a selected visit or from person screen (page: General-Scheduled actions). When focusing on a specific event and via button “Actions” the option to record the professional’s response is provided. The available response options are: Participation, No interest & No response.
Furthermore, via the option “Events” of the main menu (menu: Customers list & Actions/ Med Rep actions), the full events list is provided (scheduled & old events). When focusing on a specific event, further information regarding the participants list and each professional’s response is given.
Questionnaire
 The questionnaires are used as a tool of collecting “predefined” information regarding the health professionals. The questionnaire completion is usually performed based on a specific Market research campaign, while the mobile user has also the ability to perform ad hoc Data collections.
![C:\Documents and Settings\mat.ES-ENTERSOFT\Local Settings\Temporary Internet Files\Content.IE5\0UYK37R9\MC900433941[1].png](/images/thumb/8/8d/MOB-MedRepUserGuide_EN-image4.png/18px-MOB-MedRepUserGuide_EN-image4.png) Inquiries
Inquiries
The formation of the questionnaire inquiries is implemented in back-office via the entity Property set (menu: Customization/ Field customization/ Additional properties). The questionnaire may include inquiries of several types (free text, date, number, multiple choice etc.) some of which, via the flag Mandatory, may be marked as for obligatory completion. Furthermore, via the flag Photo, the ability to define inquiries that may have photo attachments is provided.
Note that...
Based on the default configuration, available to the device are all active property sets characterized as campaign survey or collect data.
From the several property types, the ones of type 6-Value in Base Currency, 7-Code list and 13-View are not available to the device.
The functionality of photo attachment is not available neither to “Multi-select list” inquiries nor to inquiries with a predefined “Default value”.
Campaign
The formation of a market research campaign is implemented in back-office via the task type CMP-Campaign (menu: Pharmaceutical industry/ Campaign mgmt./ Campaign generation wizard). The campaign details define the process duration, the questionnaire to be completed (section: Information) and, in case of targeted campaigns, the points of sales to participate (field: Recipients List).
Note that…
Based on the default configuration, available to the device are all market research campaigns with status active and with dates of effect within the current date.
 Market research

Access to market research campaigns is provided either from calendar screen and within a selected visit or from person screen (page: General-Scheduled actions). By activating the questionnaire completion process (button: New) the inquiries data entry screen appears. The completing mode differs depending on the “type” of the inquiry. The mandatory inquiries are marked with red color, though the ones with photo attachment functionality are marked by the activation of buttons  “Camera” for capturing photos and
  “Photographs” for reviewing them. Finally, when inquiries data entry is completed, pressing button “Save” results to the saving of the questionnaire and in parallel, if selected, to the changing of its status as completed.
Data collection
By selecting, either from calendar screen and within a selected visit or from person screen, the option “Data collection” of button “Actions”, a list with the available questionnaires is provided. When focusing on a specific questionnaire, the inquiries data entry screen appears. Concerning the questionnaire’s completion specific issues, the same applies as those described above in section “Market research”.
Photo shooting
 Photo shootings serve the need of recording, as image files, information related to the organizations or professionals visited by the mobile user. Photo shooting is provided either form calendar screen and within a selected activity or from person screen. Furthermore, as mentioned above in section “Questionnaire”, photo shooting regarding inquiries is also supported. Finally, via the entry “Photo” of the main menu (menu: My tools/ New), photo shootings regarding general issues can be conducted. By selecting the option “Photo”, regardless the referring entity, the photo task screen appears. After the photo capturing and by pressing tab “Data”, further details regarding the photo’s subject may be defined. Finally, when photo task details data entry is completed, pressing button “Save” results to the saving of a photo task and its relevant image file.
Note that...
Based on the default configuration, available to the device are photo tasks & relevant image files referring to the mobile user’s customers list.
Through the entry “Photos receipt” of the “Sync” menu, the option of downloading -via an online connection to the server- image files related to photo tasks is provided.
 Posting on Yammer
When saving a photo task, and if the functionality of posting on yammer is activated, a relevant message box appears. As for existing photo tasks, the option of posting on yammer is provided by activating the photo task list (menu: Customers list & Actions/ Med Rep actions/ Photos), focusing on a specific photo task and selecting the option “Post on Yammer” of “Actions” button.
Support
The recording of issues regarding customers support activities is provided via the actions To-Do, for ad hoc generic issues recording and Complaint, for problem recording. The mobile user is responsible for correct completing the issues and for sending them to back-office, while back-office authorized users undertake the necessary supportive actions that follow.
Ad hoc To-Do
By selecting, either from calendar screen and within a selected visit or from person screen, the option “To-Do” of button “Actions”, the data entry screen of a new issue appears with data referring to health professional pre-completed. The mobile user enters a brief description of the issue and the scheduled starting date-time. When task details data entry is completed, pressing button “Close” results to the saving of the task and in parallel, if selected, to the changing of its status as completed.
Complaint
By selecting, either from calendar screen and within a selected visit or from person screen, the option “Complaint” of button “Actions” the data entry screen of a new complaint appears with data referring to health professional pre-completed. The mobile user enters a brief description and the category-severity of the issue. In case immediate actions of resolving the problem can be provided, the relevant response is filled in, while if there is a commitment of resolving the problem on a given date, the due date must also be defined.
In case the complaint refers to specific items, from the “Contents” page and by using and by using the buttons “Items list” or “Delete” the ability to add or delete an item is provided, though via the “Attachments” button, the ability to display the complaint’s attached documents screen is given. Finally, when task details data entry is completed, pressing button “Close” results to the saving of the complaint and in parallel, if selected, to the changing of its status as completed.
Configuration info
Company parameters
- Regarding the photo shootings, the area where image files are saved is defined in company parameter “Photos from mobiles - Save in folder”.
Mobile parameters
- To activate the functionality of using last data collection answers as default values for the new questionnaires, the mobile parameter “Task_RDC_CopyLastSurvey” should be set to 1-Yes.
- To activate the functionality related to posting photos on yammer, the following mobile parameters must be properly set:
| Parameter | Value |
|---|---|
| YammerEnabled | Define value: 1 |
| YammerConversationURL |
Define the URL referring to corporate yammer (e.g. [[1]]) |
| YammerGroupID | Define the desired yammer group (e.g. 4470839) |
Internal notes
This section describes the ESMedRep application actions related to internal communication and management issues (messages & expenses list)
Messages
The messages are a mean for immediate notification of the device user about issues that concern either himself (concerns “Representative”) or specific health professionals (concerns “Promotion” or “Point of sales”).
Message formation
 The message formation is implemented in back-office via the task type MES-Message (menu: Marketing/ Merchandise/ Reports). The message details define the duration, the recipients, for messages referring to customers (section: Point of sales), or the resources-users, for messages referring to device users (section: Representatives) and the content of the message (section: Notes).
Message to user
When entering the ESMedRep application, a list of all unread messages referring to the specific resource-user appears. When focusing on a specific message and by pressing the button “Read it”, the message is characterized as “read”.
Message to professional
Access to unread messages referring to a health professional is provided via the calendar screen and within a selected appointment (page: General-Scheduled actions). When focusing on a specific message and via button “Actions” the option to mark the message as “Read” is provided.
Note that…
Based on the default configuration, available to the device are all messages with status completed and with dates of effect within the current date.
The preferable view of user’s message list can be defined on a customization level. To activate this option, the relevant command must be defined in the mobile parameter “MessageOnLoginCommand”.
Expenses list
The expenses list is a “standard” form used by the mobile user for the completion – submission of expenses conducted in the context of a specific tour. The mobile user is responsible for correct completing the expenses lists and for sending them to back-office, while back-office authorized users undertake the necessary approval actions that follow.
New expenses list
By selecting the entry “Expenses list” of the main menu (menu: My tools/ New), the data entry screen of a new expenses list form appears where, in page “General”, the description and duration of the tour must firstly be filled in.
From the “Contents” page and by using either the expense type direct selection buttons (e.g.  “FUEL”) or the
  “Expense type list” selection button, the detailed expenses recording is performed. Via the “View” & “Delete” buttons, the focused line details presentation & the deletion of the line is performed respectively, though via the “Attachments” button, the ability to display the attached documents screen is given.
 Finally, when expense details data entry is completed, pressing button “Close” results to the saving of the expenses list and in parallel, if selected, to the changing of its status as completed. By holding the expenses list in status “In progress” lets it available for additions, while the save & complete option indicates the finalization of the expenses list and, after sending it to back-office, any change from the mobile user is prohibited.
Note that...
Based on the default configuration, available to the device are all expenses lists -regardless the status- assigned to the mobile resource-user.
Reporting
This section presents the available from the ESMedRep application reports. These reports are based on local data and are designed to provide managerial & statistical information regarding the mobile user activities.
Activities overview
The ESMedRep application has several overview lists regarding the activities performed by the mobile user. For activities related to health professionals (visits, cash event registrations, complaints etc.) access is provided through the relevant options of menu “Med Rep actions” though for activities related to inter-company communication (messages & expense lists) access is provided through the relevant options of menu “Internal notes”.
Note that...
For activities that have status tracking (e.g. visits), the icons used for marking their current status are
Statistics
The ESMedRep application has several reports that can be used from the mobile user as useful informative or decision-making tools.
- New professional. Provides information regarding the new entrances of health professionals. Based on the default configuration, a professional is characterized as new entrance when his addition to a territory is within the 7 last days. Differentiation of this setting is provided via the mobile parameter “DaysNewPerson”.
- Without visit. Provides information regarding health professionals’ visiting frequency giving the ability to choose the period (30, 60 & 90 days) for which no visit has been conducted.
- Territory budgeting. Provides information regarding current period’s budget-actual number of visits, per action point, giving the ability of sorting action points based on remaining (target minus actual) visits.
- Course of budget. Reports the budget vs actual number of visits and the % of target coverage. The information is provided summarized on the level of action points’ ABC class.
- Event responses. Reports the status of registrations to conferences or events. The icons used for marking the response type are
 Registration, No interest and
  No answer.


 Systems communication
The devices, through direct connection and communication with back-office, can either download updated information or upload local transactions. This section refers to actions related to connectivity checks and data synchronization processes.
Note that…
When a device gets a new ID and in order to avoid redefinition of its settings, the ability to connect the new ID with an existing device record is provided via the option “Update device with new identifier” of “Automations” menu.
Connectivity
In order data interchanging processes to be feasible, the device and back-office connectivity must be ensured. The Internet and IIS & Application server connectivity checks are provided via the relevant options of button  “Connectivity”. In case of communication problems, the necessary information about possible causes is given.
Synchronization
By selecting one of the available options of button  “Synchronization”, the mobile user can run the necessary, at the specific time, data synchronization process.
Data sending
The data sending process uploads to back-office the latest transactions or data modifications performed by the mobile user (new persons or addresses, completion of assigned tasks, new tasks or documents, etc.)
At the beginning of data sending process a notification message appears regarding the amount and the nature of data to be sent. By selecting “OK” or “Cancel” buttons the process is activated or stopped respectively. At the end of the process, a notification message regarding the total duration appears. In case the data sending process is not feasible, a message explaining the problem cause appears.
Note that...
Via the appropriate settings, the option of showing or hiding the notification message regarding the size of data to be sent is provided (menu: Settings/ Auxiliary tasks).
Data receiving
The data receiving process downloads to the mobile device all updates in data performed by back-office users (persons & contacts updates, new tasks to be performed by mobile user, etc.)
At the end of data receiving process, a notification message regarding the amount of downloaded data and the total duration appears. In case the data receiving process is not feasible, a message explaining the problem cause appears.
Data synchronization
The data synchronization process includes both sending & receiving data process, activating at first the data sending from device process, then the data importing to back-office process and finally the data receiving from device process. The provided messaging about data amount & process duration is the same as described above in sections regarding the discrete execution of sending-receiving data.
Data initialization
The data initialization process starts at first with data sending and then proceeds to the deletion and recreation of the device’s local database. The recreation ensures that local database includes the last updated back-office & device data. At the end of data initialization process, a notification message regarding the total duration appears.
Note that...
The first time the application is installed on a device, data initialization process is activated automatically once the user enters its login credentials. Thereafter, data initialization is required only in cases when the local database recreation is wanted (e.g. change of the mobile resource-user).
Photo receiving
The photo receiving process downloads to the mobile device -via an online connection to the server- image files related either to the items catalogue (option: Items) or to photo tasks (options: Points of sale & Other photos). At the end of photo receiving process, a notification message regarding the number of downloaded photos appears. In case the photo receiving process is not feasible, a message explaining the problem cause appears.
To facilitate the parallel use of different versions of an ESMobile application, the image files which are related to the item catalogue and the photos, can be stored in a common folder, regardless the application. The required settings are:
 Item catalogue
- Create the storage area should as a virtual directory of IIS server (e.g. ESMobileProductImages).
- Declare the URL of this area to the relevant field of IIS customization tool.
Photos
- Create the storage area should as a virtual directory of IIS server (e.g. ESMobilePhotos)
- Declare the URL of this area to company parameter “Photos from mobiles-Save in folder” (e.g. http://192.168.1.195/ESMobilePhotos/)
Note that...
Based on the default configuration, the item’s code is used as the item-photo connection field and the image files must be of type jpeg. Differentiation of these settings is provided by changing respectively the mobile parameters “ItemFieldImageName” & “ImageFileExtension”.
Tools & Settings
This section presents the mobile device configuration options and a series of auxiliary & informative tools available to the mobile user.
User preferences
- Main menu. Via the option “Main menu” of the “Settings” screen, the user may adjust the main menu according to his own preferences. The activation of these settings will be viewable after the restart of the ESMobile application.
- Map. Via the option “Map” of the “Settings” screen, the user may configure items related to the look of “Calendar” and “Customers near me” screens.
User tools
 Version check. The option “Version check” of “Sync” menu executes a version comparison between the ESMobile application installed on the device and the one installed on back-office (IIS Server). When the comparison is completed and if the two versions are different, a relevant message appears giving at the same time the option of downloading the new version. Note that, by activating the selection “Automatic version check” of “Settings” screen (menu: Settings/ Auxiliary tasks), when login the application, the version check runs automatically.
- Internet connection check. Deactivating the option “Checking internet connection” of “Settings” screen, (menu: Settings/ Auxiliary tasks) the ability to stay connected to the server, even when the device is not connected to the internet, is provided.
- Show data to be sent. When the selection “Show data to be sent” of the “Settings” screen (menu: Settings/ Auxiliary tasks) is activated, at the beginning of data sending process a notification message appears regarding the amount and the nature of data to be sent.
 Check data packages. The option “Send pending packages” of “Sync” menu at first checks the device for data packages that are not yet sent to back-office and then, in case such a package exits, automatically activates the data sending process. Furthermore, through the option “Sent packages” of “Sync” menu, the list of packages sent from the device to back-office is given. Focusing on a list entry and selecting the
  “E-mail” button, the ability to send the specific package via e-mail is provided.
- Local database.Via the option “Database backup” of the “Settings” screen, the ability to backup (create copy) or restore (recover copy) the local database is provided. Furthermore, via the “Sent database” option of button
 “Sync”, the local database file can be sent directly to back-office.
 - Other data files. Via the option “Usage” of the “Settings” screen (menu: Settings/ Maintenance tasks), information regarding the local image-sound files is provided, giving at the same time the ability to delete these files.
- Application’s folders. The option “Customization files” of the “Settings” screen (menu: Settings/ Maintenance tasks) provides a list of folders regarding the ESMobile application configuration files that are installed on the device. Especially for the command files (folder: ESConfig/ Commands), by focusing on a specific file, further information about the command’s properties is given.


Regional settings
- Language. Via the option “Application language” of the “Settings” screen, the ability to define the preferable language is provided.
- Formatting. The formatting issues of location data (dates, numbers & currency) depend on the value of the mobile parameter “Culture”. Especially for Currency type fields, the following configuration options are also provided:
Currency symbol (mobile parameter: CurrencySymbol). Define a specific symbol or currency code (e.g. € or EUR). Character “space” is used for no symbol
The positive or negative value format (mobile parameter: CurrencyPositivePattern or CurrencyNegativePattern). The available options are:
| Possitive value | Negative value | |||||||||
|---|---|---|---|---|---|---|---|---|---|---|
| 0 | $n | 0 | ($n) | 4 | (n$) | 8 | -n $ | 12 | $ -n | |
| 1 | n$ | 1 | -$n | 5 | -n$ | 9 | -$ n | 13 | n- $ | |
| 2 | $ n | 2 | $-n | 6 | n-$ | 10 | n $- | 14 | ($ n) | |
| 3 | n $ | 3 | $n- | 7 | n$- | 11 | $ n- | 15 | (n $) |
Note that…
The labels of date-related fields (month, day etc.) always respect the language setting of the ESMobile application.
CRM application’s configuration
This section refers to a series of back-office configuration elements that contribute significantly in the proper functioning of ESMedRep application.
Mobile user
Users
Special attention must be given to the following configuration points:
- Physical person. The mobile user must be opened as a resource and an application user. These two entities must be connected by referring to the same physical person.
- Resource role. The resource entry referring to the mobile user must have the role “Sales”
- Services profile. At the section “Companies - Branches” of the user administration screen, the entry referring to the user’s main branch must be connected to a specific services profile.
Territories
For performing the ESMedRep application’s activities, the implementation of the preferable territory hierarchal structure is a prerequisite. Special attention must be given to the following configuration points:
- Trade account rule. The selected rule type should be the “ES.TerritoryBARule” and the selected filter type of all filters should be the “Persons-Addresses (Pharmaceutical industry)”.
- Item rule. The selected rule type should be the “ES.TerritoryItemRule” and the selected filter type of all filters should be the “Items (Pharmaceutical industry)”.
Note that…
Regarding the renewal of device’s customers list after alterations in territory data, the following rules apply:
In case of changes in territory data (e.g. new customer that follows the trade account selection rules), it is sufficient to perform the data synchronization process.
In case of changes in selection rules, either through direct change of a rule or through defining a new period, it is required to perform the data initialization process.
In order last updates in territory data to be available to the device, a scheduled task, referring to the process of applying territory hierarchy rules, must be defined.
Devices
Special attention must be given to the following configuration points:
- User. The field “User” must be filled in with the user’s code. Since the connection of user-resource via the same physical person is defined, the field referring to resource will be filled in automatically.
- Status. The device’s status must be defined as “For initialization” or “Operates”. In any other case, the execution of the synchronization processes is not allowed.
- Mobile application. The value “MedRep” must be selected.
- Operating system. The value “Apple iOS” must be selected.
- Trace method. To deactivate the functionality of recording user’s position, the trace method should be set to “No recording”. Based on the default configuration, the user’s position recording is activated in actions: Start-End of visit or appointment.
- Communication permissions. Enables the user’s rights to execute several online processes via a 3G connection. The available processes are: New version downloading, Send-Receive data and Online reporting.
- Substitute user. The substitute user serves cases when the basic mobile user is unable, for any reason, to carry out the tasks assigned to him. At the first login with the credentials of the substitute user, the initialization process is performed automatically. Afterwards, the substitute user can execute all scheduled tasks assigned to the basic user.
Main entities
Organizations& Professionals
Special attention must be given to the following configuration points:
- Category. The definition of organization’s and professional’s “Category” is mandatory.
- ABC class. For color marking the records based on ABC class, the relevant field, at both professional’s and action point’s level, should be defined (options: A, B or C)
- Address data. To display the work places of an organization as points on the map, all data referring to their addresses as well as the address’s longitude & latitude must be filled in correctly. A prerequisite, for the automatic completion of these data,
- Attachments. The attachments entity must have an auto generated counter. This definition is required in order, the process of uploading attachment files to back-office, to be feasible.
Items catalogue
Special attention must be given to the following configuration points:
- Available on mobiles. In order an item to be downloaded to device, both its grouping factors and the item itself must have the characterization “Available on mobiles”.
- Item’s comments. In order item’s extent comment to be downloaded to device, the company parameter “Download comments on items” must be activated.
- Activity journals. To activate the feature of item brochures differentiation based on the organization-professional special characteristics, the preferable activity journals should be defined.
Expense types
Special attention must be given to the following configuration points:
- Available on mobiles. In order an expense type to be downloaded to device, the “Available on mobiles” option should be activated.
- Type of expense. The suitable “Type of expense” must be defined. This information is used to connect the expense types with the relevant direct selection buttons.
Task types
To perform the various activities via ESMedRep application, the existence of the default task types is a prerequisite. The default task types’ installation process is described hereafter:
Select the option “Import data (advanced mode)” of menu “Import/Export data”. Go to folder \\ESMigration\ESCRMZero and open the file CRM_ZeroMigration_V4.emi. Define the “source space” for the data to be imported (\\ESMigration\ESCRMZero for the Greek version and \\ESMigration\ESCRMZero\EN for the international version) and press button “Run”.
 Configuration info
Task type code
- Visit. For visits recording, task type MVI-Visit is used. Differentiation of this setting is provided through the relevant company parameter.
- Appointment. For appointments recording, task type APP-Appointment is used. Differentiation of this setting is provided through the relevant company parameter.
- To-Do. For to-do tasks recording, task type TSK-To-Do is used. Differentiation of this setting is provided through the relevant company parameter.
- Complaint. For complaints recording, task type COM-Complaint is used. Based on the default configuration, this setting cannot be changed.
- Questionnaire. For questionnaires recording, task types SVA-Survey activity & RDC-Data collection are used. Based on the default configuration, this setting cannot be changed.
- Event registration. For event registrations recording, task types REG-Event registration is used. Based on the default configuration, this setting cannot be changed.
- Photo. For photos recording, task type PHOTO-Photograph is used. Based on the default configuration, this setting cannot be changed.
- Expenses. For expenses recording, task type EXP-Expenses is used. Based on the default configuration, this setting cannot be changed.
Assignment rules
- The roles that have permission to perform an activity are defined in section “Assignment rules” of the task type screen. To provide to a mobile user the permission of performing the various activities, role “Sales” must be defined and the flag “Assignment possibility” must be activated.
Task type for mobile
- Usual duration. Defines the task’s default duration (minutes). Based on the default configuration, the duration for task types Visit, Appointment & To-Do is set to 60 minutes.
- Preparation time. Defines the task’s default preparation time (minutes). This information is used by bulk visits generation processes as an interval between two visits. Based on the default configuration, the Visit’s preparation time is set to 30 minutes.
- Grouping field. Defines the field that is used as the task lines grouping factor. Based on the default configuration, the field “Family” is used. Based on the default configuration, the feature is not available in ESMedRep application.
- Days/ Future tasks. Defines the preferable number of days to send, via the data synchronization process, scheduled tasks from back-office to the device. Based on the default configuration, the limit for all task types is set to 7 days. Note that, available to the device are all scheduled tasks assigned to the mobile resource-user.
- Days/ Closed tasks. Defines the preferable number of days to send, via the data synchronization process, closed tasks from back-office to the device. Based on the default configuration, the limit for all task types is set to 0 days. Note that, available to the device are all closed tasks related to mobile user’s customers list regardless the “assigned to” resource.
- Signature. Defines whether, when closing a task, the customer’s signature screen appears. The ability to select between optional or mandatory signature is provided. Based on the default configuration, this feature is deactivated in all task types.
Note that…
The task type for mobile configuration elements are available only for task types that have the “Task group” characterization: Mobile, Mobile_Custom, PharmaIndustry or PharmaIndustryCustom.
