MOB-RetailPOSUserGuide EN
Entersoft Business Suite® | Entersoft CRM® | Entersoft Mobile Suite®
Use & Configuration guide
Identity
Document version 2.0
Software version Retail POS 2.0
Last update November 2024
Copyright
© Copyright 2011 Entersoft S.A. All legal rights reserved.
The present manual, part or all of it, may not be published or transmitted in any form without express permission by Entersoft S.A. As regards the content of the present manual…
- It may be modified at any time.
- Its purpose is solely informative.
- There is no guarantee for any errors, incorrect use or undesirable results from the use of the processes recommended in this manual.
Περιεχόμενα
Introduction
The purpose of the present manual is to provide basic usage and configuration information for the Entersoft Mobile Retail POS application (Retail POS). In summary, its individual objectives are:
- introducing and familiarizing the user with the user interface of the Retail POS application.
- providing the Retail POS user with the necessary information to perform basic daily operations.
- assisting the system administrator in matters of configuration of the Entersoft Business Suite application (EBS) that are directly related to the proper operation of the Retail POS application.
The requirements to use the Retail POS application and the present manual are:
- familiarity with all the necessary installation and setup actions of the Application server (EBS application version 5.8.0.4 + Hot fixes or later)
- familiarity with all the required actions for integration with the ESCloud application Entersoft Mobile POS for Retail
- familiarity with the interface and how to use the mobile device
- proper equipment set up to support card payments (e.g. CardLinkPOS terminal or Smart POS application)
 Note that
The Retail POS application can be installed on tablets or phablet mobile devices with the Android operating system (version 11+) or the iOS operating system (version 13+).
Daily tasks
The Retail POS application is an easy & fast tool to issue sales documents through a mobile device interface and aims to meet the need to directly serve customers, by “bypassing” the store cash registers, where a long waiting time is likely. Each RetailPOS device is a standalone workstation that directly co-operates with the branch's workstations, which have the following roles:
- CardPOS. A terminal that handles card payment settlements. This is possible via an external device integration (Cardlink POS), or via the use of the RetailPOS device itself (Smart POS).
- Printer. A workstation that covers the need to physically print or deliver via e-mail a document issued by the RetailPOS device. Keep in mind that the printing process can also be routed directly to the EBS application Server. (see Configuration & Settings/ Retail POS application/ Integrations section of the present manual). Specifically for devices with Android operating system, it is also possible to route the printing process to a local printer. (see Configuration & Settings/ Retail POS application/ Documents section of the present manual)
- Cash register. The customer is directed to this workstation, when the document issuing needs exceed the limits of the Retail POS application.

Note that
For the RetailPOS device to be fully functional, it is enough to have a camera and be directly connected to a CardPOS terminal.
User Interface
This section provides a brief description of the login screen and the main Retail POS application workspace. Keep in mind that the interface has been customized as appropriate for all tablet or phablet-based devices.
Login screen

 By calling the Retail POS application, a login credentials input screen appears (username, password & branch). By pressing the "Login" button and given that a single user is not allowed to simultaneously log in to two RetailPOS devices, apart from the authentication check of the login credentials, another check is activated to detect another RetailPOS connection with the same credentials. In case such a connection is found, a relevant informative message appears, and the system automatically disconnects it.
Via the  -Settings button, it's possible to directly access the device operation parameters configuration screen, as well as a series of auxiliary and informative tools for the device user. Detailed instructions on the “Settings” screen are provided in the Configuration & Settings/ Retail POS application section of the present manual.
Main screen

 Upon entering the Retail POS application, the workspace is automatically occupied from the main listing screen i.e. the Open baskets list. By pressing the
  -Minimize list button, the elements that make up the main screen of the application are displayed. At this point, by focusing on the area of the user icon, it is possible to either add or change their photo, or simply display its detailed information. By focusing on the main menu options, it's possible to go to the available application features, as well as log out from the application.
Search area
The Retail POS application screens usually include an area used to declare entry search criteria (item search, customer search, etc.). To search for an entry, focus on the search area, type the value of the relevant search criterion and press Accept. Keep in mind that, especially in the case of item entity, it’s also possible to search by item ID scanning.
Sales
This section describes the actions of the Retail POS application related directly to sales, as well as the tools available to perform these actions.
Retail sales
By pressing the  -Receipt button in the "Open baskets” list, the new retail sales receipt screen appears, with the document type-series details already populated and the “anonymous” retail customer as the default customer. By focusing on the document code, the full header screen is displayed. From this point on, by using the appropriate buttons, you can manage the header details.
| Button | Comments |
|---|---|

|
Change customer. By pressing the customer change button, the customer search area appears, where the user can enter one of the available identification details (phone no, TRN, e-mail or club card).
In case the search leads to an existing customer, pressing Accept immediately updates the document header with the specific customer. In case it leads to more than one customer, a selection screen appears. Keep in mind that changing the customer also results in the agreed “commercial terms” of the selected customer being automatically applied. If the search results in a non-existing customer, it’s possible to initiate the new customer creation process. |
|
|
Change salesperson. Pressing the salesperson change button displays the search screen from the salespersons list. Selecting the preferred one updates the header with the specific salesperson. |


Contents
On the first page of the "Contents" area, the user can specify items for sale. On the second page they can view the already added items (Contents section) and specify the voucher or gift cards to be redeemed (Vouchers section).
Open baskets
Adding an item line is possible by specifying the ID or barcode of the relevant item. Keep in mind that for an item that is monitored by color-size, specifying an ID that also contains dimensions results in the dimension data also being automatically populated. The available search methods are:
- By Scanning. First press the
 -Scan button, so the camera of the device is turned on, and then scan the preferred item. Follow this process successively for all imported items. Keep in mind that by activating the "Multiple scans" option, it is possible to add multiple items by closing the camera at the end of the process.
 - By Typing. Focus on the item search area, type the code or barcode of the item to be added and press the
 -Search button.


By focusing on a specific item line and using the appropriate buttons, the user can manage the line elements.
| Button | Comments |
|---|---|

|
Quantity. Regardless of how the line is added, it will be corresponding to a default sales quantity of 1 in the base MU of each item. Increasing or Decreasing the sales amount is possible by focusing on the line and pressing the corresponding button. Each press of the button results in a change of the quantity, by one MU. Focusing on the quantity field displays a pop up numeric keypad, to type in the preferred quantity. Please note that the user is protected from exceeding the permitted, per measurement unit, number of decimal places. |

|
Discount. The price-discounts of the line imported follow the rules of the current pricing policy of the company. By focusing on a line and pressing the appropriate button, you can directly specify an additional discount rate ( button) or calculate an additional discount by specifying a payable amount ( button). In any case, the additional discount updates the gross line discount. It is possible - using the appropriate configuration - to remove the right to provide additional discounts. Setup instructions for this feature can be found in the Configuration & Settings/ Retail POS application/ Documents section of this manual. button). In any case, the additional discount updates the gross line discount. It is possible - using the appropriate configuration - to remove the right to provide additional discounts. Setup instructions for this feature can be found in the Configuration & Settings/ Retail POS application/ Documents section of this manual.
|

|
Set components. For an item that has been classified as a “Set”, the following item lines appear, for reporting purposes, related to the components of the main BOM of the set. |

|
Additional info. It is possible - using the appropriate configuration - to increase the available line details. The user can show or hide these details by focusing on the "Additional info" area. You can find instructions on managing this data in the Configuration & Settings/ Retail POS application/ Documents section of the present manual. |


After adding the item lines and pressing the -Checkout button, the user is redirected to the second page of the "Contents" area, where they proceed with adding a voucher or gift card to be redeemed.
Note that
In case the user wishes to add a service line, they need to activate the "Services" option, after pressing on the
-Filter button of the item search area. Specifying the preferred service is possible either by entering a code, or by selecting from a list (button
-List)


 Vouchers


The redeem voucher line can be added either by scanning, or by directly typing the code indicated on the relevant voucher. Especially in case the document is being issued for a named customer, a similar indication is displayed, and a selection list of the customer's available vouchers appears.
The effect of redeeming a voucher on document values depends entirely on the type of voucher (discount %, discount value, gift card), while immediate information on how the document totals is formed after the voucher is applied can be found by focusing on the area “Payable amount”.
Payment settlement
Having added the voucher coupon lines, and provided that further additions or modifications to the document are not wanted, the user can proceed with the payment settlement actions. Please note that the Retail POS application only supports the full payment of a document by cash or by credit card. Any other way of settlement requires retracting the document issuing process and sending the customer to the “cash register” workstation.
 Full payment in cash

By pressing the  -Cash button, the user activates the process of charging the relevant liquidity account with the payable amount of the document and at the same time the process of its full payment. This action marks the final save of the document and its dispatch to be printed at the “printer” workstation. At this point the document is no longer available for editing by the device user.
Full payment by card
By pressing the  -Card button and scanning the customer's credit card from the CardPOS terminal, the user activates the process of charging the relevant liquidity account with the payable amount of the document and at the same time the process of its full payment. Keep in mind that in case the user has selected the non-activation of direct integration with the CardPOS terminal, pressing the button results in the display of a selection screen for card details (card type & bank). In any case, this action marks the final save of the document and its dispatch to be printed at the “printer” workstation. At this point the document is no longer available for editing by the device user.
Note that
If the user has opted for use of the CardLinkPOS terminal, it is worth knowing that:
When scanning the card, the user will always be asked about the number of installments. If the customer does not want to pay by installments, keep the number of installments at zero and press OK.
In case of failed communication with the terminal, first check the validity of the ECR settings and try quitting and re-opening the Cardlink application installed on the terminal.
If the user has opted for use of the WorldLine Smart POS service, it also supports the functionality related to the ERP integration with EFT/POS based on Circular Decision no.A.1155 / 2023.
Printing
As mentioned above, processing the full payment signals the final save of the document and its dispatch to be printed at the “printer” workstation. If a problem occurs during the printing process, the document remains as “not printed”, displaying a corresponding error message to the user. From this point on, pressing the "Reprint" button allows you to re-initiate the printing process of the current document. At the same time, from the main menu option "Print latest", the printing process can be initiated for the last document issued by the current RetailPOS device.
Reversal
If for any reason the user wishes to directly issue a credit note, calling from the application main menu the "Refund latest" option, it activates the credit note creation process as an exact copy of the last document issued by the current RetailPOS device. Please note that the payment method of the credit note is the same as the payment method for the document to be reversed.

 Basket "on hold"


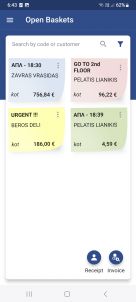
If for any reason the user wishes to start the process of creating a new document without having completed the current one, he has to close the current document by simply pressing the  -Back button. At this stage the document is put "on hold" and is displayed as a label in the "Open baskets" list, awaiting further editing by the device user. The label displays a temporary ID of the document, which is composed by the document type & time of entry, as well as the creation user & document value. At the same time it is randomly colored with one of the four default colors (blue, green, yellow, purple).
Rename
In case there is more than one document on hold, and in order to facilitate the user in identifying the document they wish to process with immediate priority, in addition to the color differentiation of the label, it is also possible to differentiate its temporary ID. In order to use this feature, focus on the
-Actions button of the relevant label, select the "Rename" action and type the preferred label.

Undo
If for any reason the user wishes to fully undo a document on hold, focus on the

Search
By pressing the
 Attention
The time period for which a document can be on hold is relatively limited (2 hours). After this time period has passed, the system automatically activates the document undo process. In order to avoid this, the user must have finalized the document - by carrying out its full payment - within the permitted time limit.
Invoicing
From the “Open baskets” list, by pressing the  -Invoice button, the customer search area appears. There, the user enters any of the available customer identification details (phone no, TRN, e-mail or club card). By pressing Accept, the new sales invoice creation screen appears, with the document type-series already populated and the “named” customer as the default customer of our choice.
Note that
In case the customer search leads to more than one customer, a selection screen appears to select the preferred one. In case it leads us to a non-existing customer, it is possible to initiate the creation process for a new customer.
Regarding the possibilities for further administration of the sales invoice, the same applies as what is described for retail sales.
 Sales order fulfillment

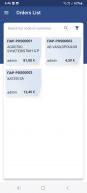
Calling the "Orders" main menu option, displays a list of pending orders that have been routed to be serviced by the Retail POS application. The day's orders are initially displayed, but it is also possible to extend the time period to seven or thirty days back, respectively, from the available options in the  -Filter area.
Focusing on an order and selecting “Receipt” or “Invoice” initiates the process of creating a new document as an exact copy of the selected order. As regards the possibilities for further management of the document generated, the same applies as what is described for retail sales.

Indexes
This section describes the actions of the Retail POS application that serves to provide information about basic entities, i.e. customers and items. Keep in mind that the full management of the basic entities is done by the back office and any intervention by the device user it’s not possible.
Items catalogue
You can access information on items for sale by selecting the Stock Items main menu option. By selecting this option and focusing on the item search area, it is possible to find an item either by scanning or by directly typing its ID. The result of the search is the display of a screen with the main data of the current item (code, description, retail price, measurement units, etc.) and with the availability info of both the current branch and other branch or partner companies.
Customers list
Access to information about the company’s named customers is provided by the Customers list option of the main menu. By selecting this option and focusing on the customer search area, it is possible to find a customer using one of the available identification details (phone no, TRN, e-mail or club card). The result of the search is the display of a screen with the main data of the current customer (code, name, TRN, etc.) and their contact details (main address, phone numbers, e-mail, etc.). From this point on, pressing "Receipt" or "Invoice" allows you to immediately go to the create new document screen. In case the search leads to more than one customer, a selection screen appears to select the preferred one.
In addition to being able to search for an existing customer, the “Customers list” also provides the possibility of adding a new customer (person or company) for whom a new document can then also be added on the spot.
Person
By pressing the
-Person button, a screen appears for the user to enter all the necessary identification details of the individual. After adding any entries and pressing the "Add" button, a check runs for the validity of the info and if no issue is detected, the new customer is saved.

Company
Pressing the
-Company button displays the screen to enter of the necessary identification details of a legal entity. Keep in mind that by filling in the TRN, the system initiates the process of retrieving the company’s registration data. After adding any entries and pressing the "Add" button, a check runs for the validity of the info and if no issue is detected, the new customer is saved.


Configuration & Settings
This section highlights instances of customization of the EBS application that play an important role in the proper operation of Retail POS. At the same time, the available settings capabilities are presented for RetailPOS devices.
EBS application
Basic entities
| User | |
|---|---|
| Individual | In order for documents issued by the device to be "stored" in the salesperson that corresponds to the relevant device user, the user and the salesperson should refer to the same individual. Please note that salesperson assignment at customer level overrides this setting. |
| Allowed access | This selection does not affect the operation of the Retail POS application. However, please note that the device user must also be registered as a user of the ESCloud application Entersoft Mobile POS for Retail. |
| Customer | |
| Code | The customer code should be set as automatically generated. This is required in order to be able to add a new customer to the back office, i.e. a customer whose primary addition is made by the device user. |
| Transaction details | Given that Retail POS is a tool for issuing sales documents, particular attention should be paid to correctly entering the customer transaction details (VAT regime, pricelist & discounts, etc.) |
| Invoicing policy | An invoicing policy should be specified which takes into account the voucher redemption scenario. |
| Item | |
| Item photo | Based on the product implementation, the user can view the image of the catalogue item. It is possible to change this behavior -at an application customization level- by intervening to the "Mobile Retail Image Photo" scroller (ESMobilePOS/ MobileRetailItemPhoto) to specify a source URL for the item photo. |
| Commercial info | Given that Retail POS is a tool for issuing sales documents, particular attention should be paid to correctly populating the item's commercial data (VAT category, measurement units, prices & discounts, etc.). |
Liquidity
| Payment method | ||
|---|---|---|
| Auto apply | This option should be disabled. | |
| Terms | There should be at least one term of “Payment” type and one of “Credit card” type with zero payable amount %. | |
| Payment by card | ||
| Clearence bank code | The DIAS codes for clearing banks supported by the respective CardPOS service should be specified. The codes for some of the supported banks are: | |
| 011 | NATIONAL BANK | |
| 014 | ALPHA | |
| 016 | ATTICA | |
| 017 | PIRAEUS | |
| 026 | EUROBANK | |
| Liquidity account | A liquidity account should be specified per clearing bank. These liquidity accounts should have the “Card-related” option enabled and the “Bank” & “Clearing bank code” information properly filled in. | |
| Credit card | The credit card types and the partner (by card type) clearing banks must be specified and have a corresponding liquidity account specified for every bank. Some of the supported credit cards are: VISA, MASTERCARD, DINNERS & AMERICAN EXPRESS. | |
Documents
To issue a receipt & invoice on the Retail POS application the user must use a document type with the generic attributes of the default types of RIN / Retail Receipt - Delivery Note & SNV / Sales Invoice - Delivery Note respectively, as well as a distinct series per document type. In addition to this, the following document type-series configuration points play an important role in the proper operation of the application.
| Type | |
|---|---|
| Automatic forecast | This option should be disabled. |
| Source transition rule | A transition rule concerning the full conversion of a customer order into a sales document must be assigned. This is necessary in order to be able to perform the customer order service process. |
| Documents w/out lines are not allowed | It is recommended that this option is disabled. |
| Check payment of total amount | It is recommended that this option is enabled. |
| Payment terms | All lines of the default retail POS payment method should be specified. At the same time, the “Auto-Displayed” and “Auto suggest amount” options should be disabled in all payment terms. |
| Series | |
| Printing | The "Print direct" and "Official report check" options should be enabled. At the same time, if the user wants the document to be physically printed from the “printer” workstation, the appropriate settings in the other printing parameters should also been made (printing device, set of commands, print form, etc.) |
| Company parameters | |
| Item search | This parameter determines the entities involved in the identification of a code when searching for an item. (parameter: FIDOC_RETAIL_INVESTIGATION_TYPE) |
| Gross discount | This parameter determines the discount field of the document line, where the gross discount is assigned. (parameter: FIASSIGNGROSSDISCOUNTCHOICE) |
Retail POS application
Integrations
| Server settings | |||
|---|---|---|---|
| Host | The communication of Retail POS with EBS is possible exclusively through an integration between the ESCloud application Entersoft Mobile POS for Retail and the EBS application. To activate this integration, ESCloud details “Bridge ID” and “Subscription ID” are required. | ||
| Printer server | The login user ID is specified at the “printer” workstation. Note that the printing process can be routed directly to the EBS Application Server. To utilize this feature, simply leave this parameter empty. | ||
| TaxisNet service | Specify the credentials for the TaxisNet information system. This is used by the new customer process and also to automatically retrieve the customer's registration information by TRN. | ||
| CardPOS settings | |||
| Enabled | Option to activate the direct integration to the CardPOS terminal. Note that in case of non-activation, specifying the payment card details (card type & bank) can be done "manually". | ||
| Log POS transactions | Option to activate the logging of the communication activity of Retail POS with the selected CardPOS service in a log file. | ||
| Share POS logs | Share (e.g. by email) the log file for the communication activity of Retail POS with the selected CardPOS service. | ||
| CardPOS service | The CardPOS terminal integration service is declared and has options “CardLink POS” and “Worldline Smart POS” available. | ||
| CardLink POS | |||
| Workstation: In the "Hostname" and "Port" properties the user specified the connection settings for the workstation where the CardLink service is installed. The CarLink service handles communication between Retail POS & the CardLinkPOS terminal. | |||
| Terminal: The ECG settings of a specific CardLinkPOS terminal are specified. In order to obtain this information, we should refer to the CardLink application installed in the relevant terminal. | 
| ||
| Device IP | Terminal IP | ||
| Device Port | Port | ||
| Device ID (TID) | TID | ||
| By pressing the “Test” button, the user is immediately informed about the device's current communication status with the CardLinkPOS terminal. In case of failed communication, first check the validity of the ECR settings, then try quitting and re-opening the CardLink application installed in the terminal. | |||
| WorldLine Smart POS | |||
| POS TID | Fill in the ID for the current terminal. This information is provided by WorldLine. | ||
| Certified store email | Specify the WorldLine-certified email account of the current branch. | ||
| Payment mode | * If the service has been acquired through a branch network of Eurobank, “DCC” value shall be assigned. Please note that there should be a liquidity account in the “Clearing Bank Code” field, where the 026-EUROBANK value is assigned. (see Configuration & Settings/ EBS application/ Liquidity of the present manual)
| ||
| Clearence bank code | Only enabled when the "Payment mode" parameter has value "Contactless". Specify the DIAS code of the bank, through which the service was acquired (e.g. 017-Piraeus). Keep in mind that there should be a liquidity account where the specified DIAS code has been a assigned in the “Clearence Bank Code” field. (see Configuration & Settings/ EBS application/ Liquidity of the present manual) | ||
| Compliance with 1155 | Option to enable the functionality related to the ERP integration with EFT/POS based on Circular Decision no. A.1155 / 2023. | ||
| AADE Transaction ID | Assign value TR1. | ||
Documents
| Document issue details | ||
|---|---|---|
| Type & Series | Specify the document type & series code for retail / wholesale & return respectively. In case the user also wants the sales order fulfillment functionality, a type & series code for sales orders can also be assigned. It is recommended to specify the same information on all retail POS devices in a branch. | |
| Guest customer | Specify the code of the proposed retail client. | |
| Local printer settings | Specify means of printing with the "Print on server" and "Print locally" options available. Note that the ability to print locally is only available on Android mobile devices and has as a prerequisite the installation of the ESMobile Printing application on the device. | |
| Print form | The Retail POS application comes with a document print form compatible with all supported printers. To use the default form, simply leave the parameter empty. In case the user wishes to change the default form, they should first place the custom form file in the ESWebAssets/POS area of the EBS application Server and then type in the name of the custom form and press the corresponding button to download this form to the device. Detailed implementation instructions for the print form are available in article KB-02735 of the Entersoft knowledge base | |
| Printer | Specify the type of local printer. Retail POS compatible printers are Bixolon SPP-R410 and Zebra ZQ520 or ZQ521. Note that in order to activate a printer through the Retail POS application, the printer device is required to be recognized by the mobile device and the two devices are required to be paired. | |
| Copies | The number of copies. | |
| Additional settings / Header | ||
| Payment method | Specify the code for the default payment method. | |
| Ability to pay with cash | Show or hide the cash payment button. Specifying the liquidity payment account is possible in the corresponding parameter of the device settings. If this parameter is empty, the liquidity account specified at the document series level is used (the "Liquidity accounts" area, the "Auto payment" column). | |
| Additional info | Specify the additional fields to display with the following options available. | |
| Type | * Label. Information field. All fields in the document header are available for selection.
| |
| Mapping | The list of available, if applicable, fields to be selected. | |
| Name | The label displayed as the field caption. | |
| Additional settings / Line | ||
| Ability to apply discounts | Show or hide the item’s additional discount buttons. Keep in mind that, especially for items that have been classified as "Set", it's not possible to specify a discount %. | |
| Name & subtitle | Specify the information that will appear as the first column of the document line, with default values the item Description & Code. All fields in the document line are available for selection. | |
| Additional info | Specify the additional fields to display with the following options available. | |
| Type | * Label. Information field. All fields in the document line are available for selection.
| |
| Mapping | The list of available, if applicable, fields to be selected. | |
| Name | The label displayed as the field caption. | |
| New line at the top | Descending or Ascending sorting of lines based on the line SEQ.NO. | |
Note that
The module with the document operation settings (Settings / Operation Profile / Documents & Series) is available only to users who have the attributes of the system administrator.
Import & Export settings
In order to facilitate the setup process for the store devices, it is now possible to update the settings of the Retail POS application by scanning a QR code. Alternatively, it is possible to update the settings by copying and pasting a special text format. This feature can be utilized by following the steps below.
First device
Install the application on a device. Initially, on the login screen that appears, fill in the credentials of a user who has the attributes of the system administrator and press the
-Settings button. Go to the “Server Settings” section and obligatorily fill in the details regarding the integration with the host. This setting is enough to log in to the Retail POS application. Evidently, if the user also knows the information required for the other integrations (Printer, TaxisNet & CardPOS), they should fill these in too.
Then, log in to the application, ignoring any error message that appears. By calling the "Settings" option of the main menu, the user is redirected to the Documents & Series section and obligatorily fill in the document type & series for retail / wholesale sales. These details are sufficient to allow the issuance of documents by the Retail POS application. Obviously, if the user also knows the information required for the other settings, they should fill these in too.
Finally, and once the process of filling in the integration details and document issuing data has been entered, call Show QR code or Share settings from the “Import/Export settings”.


Next device
Install the application on the next device. In the login screen that appears, fill in the identification details for the user of the current device and press the
This phase completes the setup process for the next device and the user is ready to start using the Retail POS application. The same process is followed for setting up all branch devices.
Information
| General | |
|---|---|
| Version info | Information on application version no. At the same time, it is possible to directly open the application's user manual. |
| User & Branch | The application login credentials (user-branch), as well as the general contact information of the branch. |
| Device | |
| Device ID | It’s the unique identification code of a device. By focusing on this element, the device code is copied to the keyboard. |
| Connection status | The user is immediately informed of the device's current communication status with the Internet ( Connected, Connected,  No connection). No connection).
|
CardLink POS service
To allow for card payment routing through the CardLink POS service, the following actions are required:
- Set up at a workstation of the store, the CardLink service that handles the integration between the Retail POS application & the CardLinkPOS terminal (Ecr2EftWeb service). Keep in mind that the integration exclusively concerns WIFI communication and therefore WIFI terminals.
- Set up on the CardlinkPOS terminal the CardLink application, which handles the payment routing by credit card and specify the required ECR settings. Here are some of the terminals that support this service.
- Verifone (Vx520, Vx675 WIFI, Vx820)
- Ingenico (ICT 220)
- PAX (A920, A920 pro, A80, IM30, A910)
- Specify in the Retail POS application parameters (Settings/ CardPOS Settings) the required communication settings with the CardLink workstation (Hostname & Port parameters) and the CardLinkPOS terminal (device IP, device Port & device ID parameters).
Note that
For detailed setup instructions for the CardLink service and the CardLink terminal, you should contact the provider of this service.
WorldLine Smart POS service
To enable card payment routing through the WorldLine Smart POS service, the following actions are required:
- Install the Worldline Smart POS and TapXPhone applications on your RetailPOS device.
- Create a relevant account with the WorldLine TapX service.
- Specify in the Retail POS application parameters (Settings/ CardPOS settings) the required communication settings with the WorldLine Smart POS service.
Note that
The WorldLine Smart POS service is only available on Android mobile phones, that support NFC technology for contactless transactions and have access to Google Play. For detailed instructions for setting up the WorldLine Smart POS service and for information on the compatibility of the service with the individual versions of the Android operating system, you should contact the provider of this service.
