MOB-SFALiteUserGuide-EN
SoftOne ERP® | Entersoft Mobile Suite®
Use & Configuration Guide
Identity
Document version 1.0
Software version SFALite 5.6.4
Last update June 2025
Copyright
© Copyright 2025 All rights reserved.
No part of this work may be reproduced, transmitted, stored, or used in any form or by any means, without the prior written permission by Entersoftone. Regarding the content of the present document…
- It may be altered at any time.
- It serves exclusively informative goals.
- No guarantee whatsoever is handed out for the possibility of existing mistakes, or the wrongful use or unwanted results, produced by the use of processes hereby followed and recommended.
Περιεχόμενα
- 1 Introduction
- 2 User interface
- 3 Main entities
- 4 Appointment management
- 5 Order
- 6 Cash collection
- 7 Reporting
- 8 Tools & Configuration
- 9 ERP application configuration
- 10 Appendix
Introduction
The purpose of this manual is to provide basic information regarding the use & configuration of the Entersoft Mobile SFALite application (ESMobile). In brief, the individual objectives are:
- Familiarizing the user with the ESMobile application user interface.
- Providing the ESMobile application user with the necessary information to execute their basic daily operations.
- Guiding the system administrator on configuration aspects of the ERP SoftOne application (ERP) that are directly related to the operation of the ESMobile application.
Requirements for using the ESMobile application and the present manual include:
- knowing all the necessary actions to install and setup the SoftOne ERP
- being familiar with the interface and operation of each mobile device
- proper set-up of the required equipment
 Note that
The present manual applies to all ESMobile platforms. The parts that, by way of exception, relate to a specific ESMobile platform, are marked accordingly (
-iOS and
-Android).
User interface
This section describes the main elements that make up the ESMobile application user interface. Firstly, there is a brief description of the login screen and the main menu, and then the main features of both the record overview screen and the data entry screen are presented. Please note here that the interface has been appropriately adjusted for tablet or phablet-based devices. Login screen
The ESMobile application call displays the application login details input screen (user name-password and serial number). By pressing the "Login" button, user identification takes place -based on the web account information- and they can enter the application. Via the:  -Settings button, it is possible to directly access the ESMobile device operation parameters configuration screen and a series of auxiliary & informative tools provided to the device user.
Main menu
By focusing – from any screen within the application – on the Catalog bookmark, the application main menu expands or collapses and by selecting any of the menu options the user is navigated to the corresponding screen or function of the application.


Overview screen
The overview screen displays the entries of an entity in the form of a list. At the top left of the screen, the screen title is displayed, while the top right displays buttons with the available alternative criteria  -Sort &
  -Search for the list entries. By focusing on a specific entry, the user will be redirected to the dashboard screen of the current entry. Alternatively -by scrolling to the right on the entry- direct access the "popular" action buttons is provided.
Dashboard screen

The dashboard screen is an “appendix” to the overview screen that enables both an increase in the information displayed on the overview screen and the ability to directly perform a series of actions. The upper part of the screen is occupied by the individual pages of the screen, while the lower part of the screen displays the preset menu buttons to call actions.

|
New entry. |
|---|---|

|
Additional information via an online connection to ERP. |

|
Extra reporting from local data. |

|
Go to the Data entry screen. |
|---|---|

|
Go to the management screen for relevant documents. |
Note that
On an
Data entry screen
The data entry screen is used to manage the data of an entity. Both the display format and the functionality of the data entry screen varies considerably, depending on the entity it’s handling each time.


Error message

Otherwise, in case a process cannot be executed for some reason, a message explaining the error appears. By clicking the “Technical information” button on the message, the system automatically writes an E-mail that is addressed to the address specified in the "System Administrator E-mail" parameter of the SFALite Configurator.
Main entities
In this section there is a description of the main entities, meaning the persons and the items that are necessary for the execution of individual ESMobile application processes. Note that all main entities are managed via the ERP and the device user cannot intervene in any of the data.
Customers
The user can access the customers base of the device via the main menu Customers option. Clicking this option first displays the complete customer base sorted alphabetically by customer name while, via the Sort button, it is possible to change the classification criterion. It’s possible to directly search for a customer by name or address (“Name”, “Address” criterion). Alternatively, by pressing the -Search button, you can also search based on other criteria. Note that, especially for the criteria name & address of the client, the voice search applies, which means that the search results are the same regardless of whether the characters are upper/lower-case or Greek/Latin. By scrolling to the right on a customer entry, it’s possible to directly access the actions of adding a new appointment, order or collection.
 Settings Settings
|
Default value |
|---|
SFALite Configurator
| Phone call application | - | |
|---|---|---|
| The application via which the phone call is made The available options are: teams & telephone. (Uri_Scheme_Type) |
SoftOne ERP
| Customer base assignment | ||
|---|---|---|
| Assigning the device’s customer base can be done via ERP and is based on the user-customer connection through an appropriate setting either of the salesperson field or the collector field of the Customer entity. |
Dashboard screen
By focusing on a specific customer, the user is redirected to its dashboard screen where it’s possible to see its overview. The -View button redirects the user to a screen with the customer's main data screen, while the -Attachments button redirects the user to its attachments management screen. Finally, using the -Actions button you can add a new appointment, order or collection. The individual pages of the dashboard display provide information based on local data and related to the overall customer activity.
| Page | Comments |
|---|
General
| General info | The main customer identification data. | 
|
|---|---|---|
| Communication | The customer contact details. By clicking on the elements of this area, it is possible to directly use alternative means of communication (e.g. map navigation, phone call, E-mail, website navigation). | |
| Info | The customer's grouping & invoicing policy data. | |
| Yearly summary | The amount of orders, sales & collections for the current and previous year, as well as the change index. It should be noted that, in order for the figures to be comparable, the amount of the previous year does not include the months after the current month. |
History
| Appointments | Appointments made by the salesperson-user of the device sorted by start date. | 
|
|---|---|---|
| Orders | Orders submitted by the salesperson-user of the device, sorted by date of issue. | |
| Collections | The collection receipts submitted by the salesperson-user of the device sorted by date of issue. | |
Using the “Salesperson” criterion, the user can display entries made by other users and using the -Search button, it’s possible to search by other criteria. In order to distinguish entries in relation to their delivery status to ERP, the entries are labeled with the appropriate icon ( for Sent and for Sent and  for To send). for To send).
| ||
Item range
| Items sold by the salesperson-user of the device during the last 12 months, sorted by sales quantity. Using the “Salesperson” criterion, the user can display entries made by other users and using the -Sort button, it’s possible to change the entry sorting criterion.
|
|---|
Open orders
| Orders containing items with an uninvoiced quantity. When focusing on a specific order, the information is analyzed the item level. | |
|---|---|
 
| |
Ledger
| The “accounting” customer ledger with detailed entries and cumulative balance. Please note that this report is available via online connection to the ERP. |
|---|
Yearly comparison
| The sales quantity-value per period, for the current and previous year, as well as their deviation %. When focusing on a specific period, the information is analyzed by item level. | |
|---|---|
 
| |
Item catalogue
 Access to the Item catalogue is provided via the relevant main menu option (menu: My Tools/Items and prices). Alternatively, using the Item presentation option, it is possible to display the item catalogue in the form of a photo gallery. Pressing any of these options first displays the complete list of items sorted alphabetically by item description and, at the same time, using the Sort button, allows the user to change the sorting criterion. It’s possible to directly search for an item by item code or description (criterion "Code, Description"). Alternatively, by pressing the -Search button, you can also search based on other criteria. Note here that, especially for the criteria code & description of species the phonetic search applies, which means that the search result is the same, regardless of whether uppercase-lowercase or Greek-Latin characters are used.
| Settings
|
Default value |
|---|
SFALite Configurator
| Available on mobile | BOOL01 | |
|---|---|---|
| The assignment of the device’s item catalogue is based on the “Available on mobile” field of the Item entity. From the full list of company items available on the device, only those that have this designation enabled are available. Keep in mind, the field that should be used for this designation can be specified in the corresponding parameter of the SFALite Configurator. (Ιtem_AvailableInMobile_Field) | ||
| Day limit / Entries | 60 | |
| The preferred number of days to send from ERP to the device of the sales entries & sales return. (DaysForTradeAccountEntries) |
SoftOne ERP
| Prices in the MU | ||
|---|---|---|
Determines whether the price in sales documents is for the main measurement unit or sales measurement unit. Keep in mind that the parameter also determines whether the quantity in Main MU or in Sales MU participates in the calculation of the document value. The parameter can be configured from the corresponding field of the sales configuration screen. The available options are:
|
||
| MU rate | ||
Determines how alternative measurement units (Sales MU & Alternative MU-2) are associated with the Main PM. The parameter can be configured by the corresponding field of the warehouse configuration screen. The available options are:
|
Dashboard screen
By focusing on a specific item, the user is redirected to its dashboard screen, where its possible to draw information regarding features, availability data or statistics for the item, while using the -Attached documents button, it's possible to go the management screen of its item attachments. The individual pages of the dashboard screen provide information based on local data and relate to the overall item movements.
| Page | Comments |
|---|
General
| General info | The basic identification and grouping details of the item. | 
|
|---|---|---|
| Info | The invoicing policy details of the item. | |
| Balances | The item availability to the whole company and current branch (balance-expected). Keep in mind that the availability data is only updated via the data sync process. | |
| Item presentation | The overview and notes of the item. Keep in mind that the item overview is made available on the device via the “Receive photos” process of the “Sync” menu. | |
| Instructions for the required settings to download the photos can be found in the Tools & Configuration/ Systems communication/ Data synchronization/ Receive photos section of the current manual. | ||
| Measurement units | The alternative measurement units of the item. Keep in mind that, out of the total item MUs, the ESMobile application only supports: Main MU, MU, Sales & Alternative MU-2. | |
History
| Sales or return movements of the item. It should be stressed that the "Day limit / Entries" parameter of the SFALite Configurator determines the past period for which we wish to display the item movements on the device. |
|---|
Properties
| The additional item properties. | |
|---|---|
 
| |
Yearly comparison
| The sales quantity-value per period, for the current and previous year, as well as their deviation %. When focusing on a specific period, the information is analyzed by customer level. |
|---|
Appointment management
This section describes the ESMobile application actions related to planning the salesperson-user daily operations, as well as the available tools for scheduling said operations.
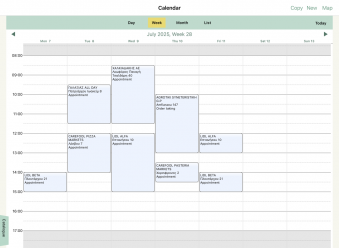 Calendar

The calendar develops the already scheduled appointments, but at the same time gives the user the ability to register either a new ad hoc appointment or bulk creation of appointments (“New” & “Copy” buttons). At the same time, by focusing on an existing appointment, it is possible to directly transfer it to a new day-time.
The current date appointments are displayed, while selecting the “Week” & “Month” tabs will allow the user to review the current week-month appointments respectively, as well as navigate to previous or upcoming time intervals.
 Specifically in the case of daily appointments display, they are also directly displayed in the form of a pin on the map. By focusing on a pin, a pop up screen appears, with the details of the selected point. At the same time, it’s possible to display the distance in km between the user's current position and the selected point. Keep in mind that, especially in
  -Android platforms, this distance in km information is available through a specific Google service (Distance Matrix). Therefore, in order to display it, its activation key should be specified in company parameter “Google maps key”. Finally, pressing the -Information button redirects the user to the dashboard screen for the point of sales, while pressing the
  -Routing button redirects them to the specialized Maps application, with the starting point and the destination automatically filled in.
| Settings
|
Default value |
|---|
SFALite Configurator
| Preparation time (minutes) | 30 | |
|---|---|---|
| The appointment’s default preparation time (minutes). It is exclusively used by the bulk appointment creation processes, as the interval between two meetings. (es.sap_DefaultMinutesToPrepare) | ||
| Usual duration (minutes) | 60 | |
| The default duration of the meeting (minutes). It is used by all appointment generation processes. (es.sap_DefaultMinutesToEnd) | ||
| Appointment series | ||
| The suggested Appointment task series. (Appointment_Series) | ||
| Day limit / Future appointments | 7 | |
| The preferred number of days to send from the ERP to the scheduled appointments device. (es.sap_DaysForFutureMobileTasks) | ||
| Day limit / Closed appointments | 30 | |
| The preferred number of days to send from the ERP to the completed appointments device. (es.sap_DaysForClosedMobileTasks) | ||
| Morning zone / Start | 08:00 | |
| The morning zone starting time. This information is used to define the non-grayed area of the calendar screen. (MorningZoneStartTime) | ||
| Morning zone / End | 17:00 | |
| The morning zone end time. This information is used to define the non-grayed area of the calendar screen. (MorningZoneEndTime) | ||
| Working hours / Start | 08:00 | |
| The start time of working hours. The information is used by the bulk appointment creation processes. (StartWorkingTime) | ||
| Working hours / End | 17:00 | |
| The end time of working hours. The information is used by the bulk add appointment processes. (EndWorkingTime) | ||
| Phone call application | ||
| The application via which the phone call is made The available options are: teams & telephone. (Uri_Scheme_Type) | ||
| Google maps key | ||
| The key to use Google's map service. Specific to the -Android platform. (Googlekey)
|
Dashboard screen
By focusing on a specific appointment in the Calendar, the user is redirected to its dashboard screen where they can view an overview of the customer related to the appointment.. The -View button redirects the user to data entry screen of the appointment, while the -Attachments button redirects to its attachments management screen. Finally, using the -Actions button you can add a new appointment, order or collection. The individual pages of the dashboard screen provide information based on local data and refer to the overall customer activity associated with the appointment.
| Page | Comments |
|---|
General
| General info | The button identification details of the meeting. | 
|
|---|---|---|
| Communication | The customer contact details. By clicking on the elements of this area, it is possible to directly use alternative means of communication (e.g. map navigation, phone call, E-mail, website navigation). | |
| Info | The button identification details of the appointment customer. | |
| Yearly summary | The amount of orders, sales & collections for the current and previous year, as well as the change index. It should be noted that, in order for the figures to be comparable, the amount of the previous year does not include the months after the current month. | |
History
| Appointments | Appointments made by the salesperson-user of the device sorted by start date. |
|
|---|---|---|
| Orders | Orders submitted by the salesperson-user of the device, sorted by date of issue. | |
| Collections | The collection receipts submitted by the salesperson-user of the device sorted by date of issue. | |
| Using the “Salesperson” criterion, the user can display entries made by other users and using the -Search button, it’s possible to search by other criteria. In order to distinguish entries in relation to their delivery status to ERP, the entries are labeled with the appropriate icon ( for Sent and for To send).
| ||
Item range
| Items sold by the salesperson-user of the device during the last 12 months, sorted by sales quantity. Using the “Salesperson” criterion, the user can display entries made by other users and using the -Sort button, it’s possible to change the entry sorting criterion.
|
|---|
Open orders
| Orders containing items with an uninvoiced quantity. When focusing on a specific order, the information is analyzed the item level. | |
|---|---|
|
| |
Ledger
| The “accounting” customer ledger with detailed entries and cumulative balance. Please note that this report is available via online connection to the ERP. |
|---|
Yearly comparison
| The sales quantity-value per period, for the current and previous year, as well as their deviation %. When focusing on a specific period, the information is analyzed by item level. | |
|---|---|
|
| |
Appointment handling
The top-right buttons of the appointment dashboard screen are by default and aim to meet the need to record the actual time spent by the user during a meeting.
| Button | Comment | ||
|---|---|---|---|

|
Start | Updates the meeting start date-time in real time. | 
|

|
Completed | Updates the meeting's end time date-hour in real time and changes its status to "Completed". Keep in mind that the action of completing a meeting requires that it has already been started. | |

|
Cancellation | Updates the appointment end date and changes the appointment status to “Canceled”. | |
In case entering further details on the appointment (e.g. notes) is required, pressing the -View button of the dashboard screen navigates the user to the data entry screen of the current appointment. This screen allows the user to modify the appointment data, perform a series of actions (-Actions button), as well as saving it while at the same time changing its status ( -Save button).
Data entry screen
| Field | Comments |
|---|---|
| Series | The default appointment series is the one set in the corresponding parameter of the SFA Configurator. However, the device user is able to select a different series. Keep in mind that, because the appointment numbering is given when it’s sent to ERP, it's fully acceptable for all users of the ESMobile application to use the same series. |
| Description | Filled in by the user. |
| Customer | The customer of the entry from which the appointment was added. This field cannot be modified. |
| Address | The system offers the address of the entry that was used to add the appointment as the default address. However, the user is also able to select one of the alternative customer addresses. |
| Start (planned) | When adding a new ad hoc meeting, the default date-time is the current one. |
| End (planned) | The default value is calculated by taking into account the “Planned start” of the task and the “Usual duration” of the appointment. |
| Priority & Flag | Filled in by the user. |
| State | Updates when the appointment is saved. This field cannot be modified. |
| Actual start | It is updated by the appointment start process. This field cannot be modified. |
| End (actual) | Updates when the appointment is completed. This field cannot be modified. |
| Notes | Filled in by the user. |
Appointment scheduling tools
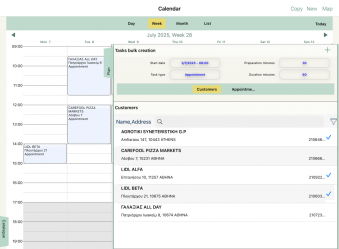 Bulk create

The  -New button on the Calendar screen allows the user to bulk create appointments by selecting entries from a customer list or from an appointments list. Initially, the time frames for the creation of the appointments (start date-time, preparation minutes & duration) need to be defined. Then, focusing on the preferred entries in the list and pressing the -Accept button starts the bulk appointment creation process. The imported appointments are placed in succession in the "available" time, taking into account both the working hours and non-working days of the company, as well as the already planned appointments.
Bulk copy
The bulk copy appointments process is a tool for easy import of appointments, characterized by their repeatability when it comes to scheduling time.
 By placing the cursor on a specific day, week, or month and by calling the
  -Copy button of the Calendar screen, a list will appear, with open & completed appointments that are within the preferred time interval. By focusing on the preferred list entries and pressing the -Select button, a screen appears to set the start date for placing the copied appointments. Then and by confirming the selections, an exact copy of the appointments selected is created, which has simply shifted in terms of time, based on the set start date. Keep in mind that each of the copied appointments is placed within the time limits indicated in the corresponding appointment to be copied, regardless of whether these are within or outside business hours and regardless of whether they coincide with the time limits of another already scheduled appointment. The exception is the case where the day of the copied appointment coincides with a non-working day and it is moved at the same time limits with the working day that comes right after it.
Next appointment
Through the Next appointment option of the main menu, a phonetic reminder is available for the mobile user, with the next appointment’s details (customer & time).
 Technical information
Specifically on the
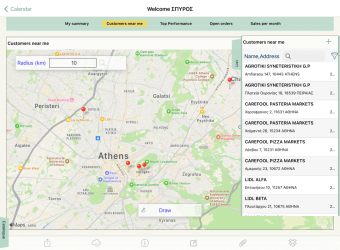 Customers near me
Through the Customers near me page of the screen “My Summary”, it is possible to display, in the form of a list as well as a pin on the map, the customers that are located within a specific distance from the device user’s current location. The default km radius can be set in the corresponding field of the "Settings" screen (screen: Settings/ Operation profile/ Map). At the same time, by pressing the  -Radius button, it is possible to limit or extend the radius through the environment of that screen. Keep in mind that the “Customers near me” screen also allows you to directly call the bulk import appointments process for customers that meet the set km radius.
Order

 The ESMobile app provides the ability to fully manage type 1-Order documents. The device user is responsible for properly filling in and sending the document to the ERP. There, the document is checked and further handled. Note that:
- In order to ensure the smooth operation of the data delivery process, the document identification data entered by the ESMobile application (series-code) should be unique. Specifying a a different series per user plays a key part in ensuring this uniqueness. Instructions for setting up the document series can be found in section ERP application configuration/ Device user/ Salesperson-User of the present manual.
- Once a document has been sent to the ERP, modifying it is not allowed, using the ESMobile application interface.
Order management
By calling the new order action, the data entry screen of the document appears, with the customer-address information already populated and other key header elements, mainly related to the customer (General page). The user is the one specifying the document items, through appropriately configured insert lines buttons (Contents page). At the same time, and to facilitate the ordering process, the data entry screen of the document allows you to directly draw information regarding the customer’s details (the Comparative page). After having registered everything, pressing the -End button saves the current document.
| Settings
|
Default value |
|---|
SFALite Configurator
| Generating Document E-mails | PDF/Speech | |
|---|---|---|
Configures the behavior of the document delivery via E-mail process. The available options are: (MailMergeMode)
|
||
| VAT calculation in totals | 0-No | |
| Calculates the VAT value on the total, per VAT category, net value of the document. (Doc_VatInTotals) | ||
| Rounding method | Away From Zero | |
| The rounding method used in calculating the value fields of the document. (RoundingMethod) | ||
| Online invoicing policy | 1-Yes | |
| Determines whether, upon saving the document, the online invoicing policy application is activated automatically. (1_AutoApplyOnlinePolicy) | ||
| Line grouping field | Group | |
| The document line field used as a line grouping field. (Doc_GroupField) | ||
| Balance check | 0-No | |
| Determines whether, upon adding an item to the document, the feature of balance exceedance check is also called automatically. The available options are: 0-No, 1-Warning, 2-Prohibition. (1_CheckItemBalance) | ||
| Same item behavior | 0-Addition | |
| Determines the effect of adding an already existing item to the document. The available options are: 0-Addition, 1-New line, 2-Warning, 3-Prohibition. (1_DocLineSameItemBehaviour) | ||
| Selection via barcode / Use of camera | 1-Yes | |
| Enables the use of the camera as a barcode scanner device. (Barcode_UseCamera) | ||
| Selection via barcode / Keyboard display | 0-No | |
| Displays the keyboard in a barcode scanning area. (Barcode_UseKeyboard) | ||
| Selection via barcode / Auto-display of scan area | 0-No | |
| Automatically displays, upon opening the document, the barcode scanning area. (Doc_AutoOpenBarcodePanel) | ||
| Select from List / Entry limit | 30 | |
| The number of amounts that corresponds to the "Select all" button of the “insert lines list” type screen. (Doc_InvestigateItemLimit) | ||
| Select from List / Quantity | 1 | |
| The default quantity that corresponds to the “Select all” button of the “insert lines list” type screen. (Doc_ItemInvForm_DefaultQty) | ||
| User intervention in fields / Item price | 0-No | |
| The user can intervene to the Unit price field of the document line. (Doc_AllowEditPrice) | ||
| User intervention in fields / Discount-1 % | 0-No | |
| The user can intervene to the % Discount-1 field of the document line. (Doc_AllowEditDiscount1) | ||
| User intervention in fields / Discount-2 % | 0-No | |
| The user can intervene to the % Discount-2 field of the document line. (Doc_AllowEditDiscount2) | ||
| User intervention in fields / Discount-3 % | 1-Yes | |
| The user can intervene to the % Discount-3 field of the document line. (Doc_AllowEditDiscount3) | ||
| Order / Reason | Reason | |
| The field of the document line used as Reason. Used by the process of sending data from the mobile application to ERP. The available options are: Reasons, Notes, Notes 2. (Doc_Reason_Send_Field) |
SoftOne ERP
| Prices in the MU | ||
|---|---|---|
Determines whether the price in sales documents concerns the Main MU or the Sales MU. Note that the parameter also determines whether the quantity in a main measurement unit or the quantity sales measurement unit participates in the calculation of the document value. The parameter can be configured from the corresponding field of the sales configuration screen. The available options are:
|
||
| MU rate | ||
How to associate alternative measurement units (Sales MU & Alternative MU-2) with the Main MU. The parameter can be defined from the corresponding field of the warehouse configuration screen. The available options are:
|
||
| Discount application | ||
The application method for discounts 1-2-3 of the document line. The parameter can be configured from the corresponding field of the sales configuration screen. The available options are:
|
||
| Number of decimals / Item price | ||
| The number of decimals for numeric value fields of type “Price”. The parameter can be set from the corresponding field of the company's currency input screen. | ||
| Number of decimals / Values | ||
| The number of decimals for numeric value fields of type “Value”. The parameter can be set from the corresponding field of the company's currency input screen. |
Data entry screen
| Field | Comments |
|---|---|
| Header | |
| Series | The default order series assigned to the device salesperson-user. Note that in case there is more than series, the field shall be filled in by the user. This field cannot be empty. |
| Code | Automatically generated, based on the specified series. This field cannot be modified. |
| Issued on | The current date. This field cannot be modified. |
| Customer | The customer of the entry from which document was added. This field cannot be modified. |
| Address | The system offers the address of the entry that was used to add the document as the default address. However, the user is also able to select one of the alternative customer addresses. |
| Payment method | The default is the customer’s payment method. |
| Shipping method | The default is the customer’s shipment method. |
| Sent on | The user fills in the date agreed with the customer. |
| Notes | Filled in by the user. |
| Printed | Automatically enabled after physical document has been successfully printed. This field cannot be modified. |
| Contents | |
| Item | The stock item to which the document line refers. |
| Quantity | The quantity field is always expressed in conjunction with the Sales MU. The default value is transferred as is from a line addition list but can be modified by the user. When specifying the quantity, an overflow check is activated -by measurement unit- for the allowed number of decimal digits and in the event of a discrepancy, a relevant user notification message is displayed. Note that every change in quantity in the Sales MU initially activates the quantity calculation in the Main MU and then the quantity calculation in the Alternative MU-2. |
| Sales MU | The Sales MU of the item to which the document line refers. This field cannot be modified. |
| Alternative
quantity |
The alternative quantity field is always expressed in conjunction with the Alternative MU-2 and is available only in items for which an Alternative MU-2 is set. The default value is transferred as is from a line addition list but can be modified by the user. When specifying the alternative quantity, an overflow check is activated -by measurement unit- for the allowed number of decimal digits and in the event of a discrepancy, a relevant user notification message is displayed. Note that every change in quantity to an Alternative MU-2 initially triggers the calculation of quantity in the Main MU and then the calculation of quantity in the Sales MU. |
| Alternative MU-2 | The Alternative MU-2 of the item that the document line refers to and is available only in items for which an Alternative MU-2 is set. This field cannot be modified. |
| Main MU Quantity | The quantity in the Main MU is always calculated based on the relationship between the Main MU and Sales MU. This field cannot be modified. |
| Price | The default price depends on whether the system can detect or not -in the local pricelist- a pricelist line, the dimensions of which “match” the following details: date / customer invoicing category / customer / item pricing group / current document line item. In case of detection, it is transferred from the price list as it is and in case of non-detection, it is transferred from the corresponding item field taking into account the price zone of the customer. User intervention depends on the setting of the corresponding parameter of the SFALite Configurator. A list of the local pricelist features is provided in section Local pricelist of the present manual. |
| Discount 1 % | The default price depends on whether the system can detect or not -in the local pricelist- a pricelist line, the dimensions of which “match” the following details: date / customer invoicing category / customer / item pricing group / current document line item. In case of detection, it is transferred from the price list as it is and in case of non-detection, it is transferred from the corresponding item field. User intervention depends on the setting of the corresponding parameter of the SFALite Configurator. A list of the local pricelist features is provided in section Local pricelist of the present manual. |
| Discount % 2 & 3 | The default price depends on whether the system can detect or not -in the local pricelist- a pricelist line, the dimensions of which “match” the following details: date / customer invoicing category / customer / item pricing group / current document line item. In case of detection, it is transferred from the price list as it is and in case of non-detection it is zero. User intervention depends on the setting of the corresponding parameter of the SFALite Configurator. A list of the local pricelist features is provided in section Local pricelist of the present manual. |
| Discount 4 % | Transferred from the customer's Discount % field. This field cannot be modified. Note that this percentage is always applied to the result obtained after the calculation of the Discount 1-2-3 %. |
| Discounts | The total discount value of the document line. This field cannot be modified. |
| Net value | The net value of the document line. This field cannot be modified. |
| VAT value | The total VAT value of the document line. This field cannot be modified. |
| Total | The total value of the document line. This field cannot be modified. |
By focusing on a specific document line and by using the appropriate buttons, it is possible to manage the line.


| Button | Comments |
|---|---|

|
Quantity & Sales MU of the item. For declared items and the Alternate MU-2, the corresponding quantity input button is displayed. |

|
By focusing on a numerical field of the line, the numeric keypad pops up. In order to facilitate data input, the keyboard includes the up- down arrow buttons which the user can use to move between previous-next lines of a document. In particular, in the case of the Price & % Discount, when moving the amount is also applied. This feature concerns the  -iOS platform only. -iOS platform only.
|

|
Full line details. The full line information screen button is displayed by sliding to the right on the current line. |

|
Delete line. The delete line button is displayed by sliding to the right on the current line. |
| Group totals | |
|---|---|
| Quantities & Values | The sum, by grouping field, of the document line's corresponding fields. Using the  -Collapse button, it is possible to expand-collapse the groups. Specifically, in the UWP & Android platforms, it is also possible to focus on the area of a group, in order to expand-collapse a specific group. -Collapse button, it is possible to expand-collapse the groups. Specifically, in the UWP & Android platforms, it is also possible to focus on the area of a group, in order to expand-collapse a specific group.
|
| General totals | |
| Quantities & Values | The aggregate sum of the document line’s corresponding fields. |
Insert line buttons
Inserting document lines can be done using any one of the available buttons of line insert list type or using the Barcode button. Note that, by focusing, from a line insert list, on the preferred item and pressing the -Select button, lines are inserted while allowing the user to remain on the list, while by pressing the  -Back button the user can insert lines and return to the task's data entry screen.
| Button | Comments |
|---|---|

|
Items list & Photo catalogue. Displays a list of the stock item catalogue.
The list is sorted alphabetically by item description, while also allowing sorting by code or the date of last sale. Searching for a specific item is possible either by code, or other identification data (description, grouping manufacturer). In addition to the key elements of the item (image-code-description), the following information is also displayed:
|

|
Item range. Displays the items sold to the current customer during the period of the last 12 months. This information is derived from the comparative sales data of the local database. Regarding the sort-search and information displayed in the list, the same applies as described above for the "Items list" button. |

|
Documents Displays a list of type 1-Order documents that refer to the current customer. When inserting document lines, the quantity & measurement unit details of the selected document are transferred to the corresponding document line fields. Note that the price-discount details are not transferred but are calculated from the start based on the local pricelist data. |

|
Barcode. Displays the item’s barcode scanning area. Note that for the identification of the barcode, the barcode & code fields of the Item entity are checked in order. |


Other buttons
The other buttons of the data entry document screen are on default and meet the need for ergonomic display of actions, related to either document management or to obtaining additional information on it.
| Button | Comment | ||
|---|---|---|---|
|
|
Actions | Displays actions that concern data management for the current document. | |
| Update discount-3 % | Bulk assignment of a specific discount percentage at the Discount-3 % field of every line. | ||
| Online invoicing policy | Sends the information already saved in the document to the ERP system. Based on this information, an overview of the document is first established, taking into account both the applicable invoicing policy (pricelist & discounts) as it stands in the ERP system and then this overview is displayed in a preview screen. The online invoicing policy features are available in section Online invoicing policy of the present manual. | ||

|
Save | Save the current document. Note that by enabling the "Online invoicing policy" (1_AutoApplyOnlinePolicy) parameter of the SFALite Configurator and pressing the save button automatically, Online invoicing policy call is executed. | |
Dashboard screen
 The full sales document list can be accessed via the “Orders” option of the main menu (menu: Customers & Sales/ Sales actions). By sliding right on a document entry, you can immediately access the print or delivery actions via E-mail. Alternatively, by focusing on a specific document, the user is redirected to the dashboard screen, where an overview of the document can be viewed (code, date of issue, status, etc.). The -View button redirects the user to its data entry screen, while the -Attachments button redirects to its attachments management screen. Finally, the -Actions button allows the user to directly perform a series of actions on the current document.
| Action | Comments |
|---|---|
Copy |
Automatically creates a 1-Order type document as an exact copy of the selected document. |
Printing |
Triggers the physical printing process of the document. Note that the physical printing of a document requires a specific document type or series. The required settings can be found in section ERP application configuration/ Document types & series of the present manual. |
Send via E-mail |
Auto-composes an E-mail with the customer as the recipient and a PDF-type file as an attachment, displaying the current document's details. Note that, through an appropriate setting of the parameter "Generation method of E-mail document" (MailMergeMode) of the SFALite Configurator, text recording is also possible. |
Invoicing policy
Local pricelist
As mentioned above, the available data in the local pricelist are a subset of the invoicing policy data specified in the ERP. In particular, out of all the settings of a pricelist, available in the local pricelist are:
Policy definition | |
|---|---|
| Application fields | Up to 4 application fields are supported. Out of all the available options, the following are supported:
|
| Conditions | Up to 4 conditions fields are supported. Out of all the available options, the following are supported:
|
Application scenario | |
| Only the first rule is supported by the application scenario. | |
The default value for fields Price & Discount 1-2-3 % of the document line depends on whether it can detect -in the local pricelist- a pricelist line, the dimensions of which “match” the details: date / customer invoicing category / customer / item invoicing category / current document line item. The table below shows the default, on a case-by-case basis, value of the Price & Discounts 1-2-3-4 field on the document line.
| Pricelist
line exists |
Price | Discount 1 % | Discount 2-3 % | Discount 4 % |
|---|---|---|---|---|
| No | From Item (Zone price) | From Item | - | From Customer |
| Yes | From Pricelist | From Pricelist | From Pricelist | From Customer |
| where, the Zone price is the value of the Item entity that corresponds to the customer price zone | ||||
 Attention
In the event that the company’s invoicing policy exceeds the limits of the local pricelist, for full accuracy of the price and discount elements of the document to be issued, it is necessary to obtain these details from the ERP system via calling the Online invoicing policy.
Online invoicing policy
As mentioned above, the available local data depicts a subset of the invoicing policy data specified in the ERP system. The online invoicing policy application covers cases that require, when issuing a document using the device, absolute accuracy of the invoicing details.

 By going to the document data entry screen and calling the Online invoicing policy option of -Actions button, it is possible to activate -via a direct connection with the ERP system- the invoicing policy that has been agreed with the customer. First, the information that’s already saved in the document is send to the ERP where, based on it, a document overview is formed by enforcing all of the agreement’s “fulfilled” rules. At the next step, the document’s overall view is sent from the ERP to the device and is displayed on a preview screen. Finally, by pressing the -Save button of the document preview screen, it is possible to accept or cancel the invoicing policy results. Clicking on “Accept” results in the document elements being matched to those of the preview screen and signals the completion of the document issue process, by subsequently prohibiting any user intervention to it, while selecting “Cancel” will close the preview screen and simply return to the data entry document screen.
Cash collection
The ESMobile application makes it possible to fully manage documents of 51-Cash receipt type (cash & notes). The device user is responsible for properly filling in and sending the document to the ERP. There, the document is checked and further handled. Note that:
- To ensure the smooth operation of the data transmission process, each document’s identification data (series–code) generated by the ESMobile application must be unique. Defining a different document series per user plays a crucial role in maintaining this uniqueness. Detailed instructions for configuring document series can be found in section ERP Application Configuration / Device User / Salesperson–User of this manual. Once a document has been sent to the ERP, modifying it is not allowed, using the ESMobile application interface.
Collection management
By calling the new collection action, the data entry screen of the document appears, with the customer-address information already populated and other key header elements, mainly related to the customer (General page). The user is the one specifying the collection lines, through appropriately configured input line buttons (Contents page). After having registered everything, pressing the -End button saves the current document.
| Settings
|
Default value |
|---|
SFALite Configurator
| Generating Document E-mails | PDF/Speech | |
|---|---|---|
Configures the behavior of the document delivery via E-mail process. The available options are: (MailMergeMode)
|
||
| Notes / Entry type | ||
| The type of receivable note entry. Used by the process of sending data from the mobile application to ERP. (Collection_Note_Type) | ||
| Notes / Series | ||
| The receivable note issuing series. Used by the process of sending data from the mobile application to ERP. (Collection_Note_Series) |
Data entry screen
| Field | Comments |
|---|---|
| Header | |
| Series | The default collection series is the one assigned to the salesperson-user of the device. Note that in case there is more than series, the field shall be filled in by the user. This field cannot be empty. |
| Code | Automatically generated, based on the specified series. This field cannot be modified. |
| Issued on | The current date. This field cannot be modified. |
| Customer | The customer of the entry from which document was added. This field cannot be modified. |
| Address | The system offers the address of the entry that was used to add the document as the default address. However, the user is also able to select one of the alternative customer addresses. |
| Notes | Filled in by the user. |
| Printed | Automatically enabled after physical document has been successfully printed. This field cannot be modified. |
| Contents | |
| Line type | Mode of line amount collection with the following available values: Cash & Note. Automatically populated based on the insert line button. This field cannot be modified. |
| Value | The collection amount. |
| Number | Filled in by the user. Concerns the note number. |
| Issued on | Filled in by the user. Concerns the note's date of issue. Note that the date of the issue of the note is automatically filled-in by the system, with the current date as the default value. |
| End | Filled in by the user. Concerns the note's expiry date. This field cannot be empty. |
By focusing on a specific cash collection line and by using the appropriate buttons, the user can manage the line.
| Button | Comments |
|---|---|
|
|
By focusing on a numerical field of the line, the numeric keypad pops up. |
|
|
Delete line. The delete line button is displayed by sliding to the right on the current line. |
| General totals | |
|---|---|
| Values | The total sum of the cash collection line’s corresponding fields. |
Insert line buttons
Inserting a collection line is possible by using any one of the available buttons on the collection document data entry screen.
| Button | Comments |
|---|---|

|
Cash. Inserts a Cash-type line. |

|
Note. Inserts a Note-type line. |
Dashboard screen
 The full collection documents list can be accessed via the “Collections” option of the main menu (menu: Customers & Actions/ Sales actions). By sliding right on a document entry, you can immediately access the print or E-mail actions. Alternatively, by focusing on a specific document, the user is redirected to the dashboard screen, where an overview of the document can be viewed (code, date of issue, status, etc.). The -View button redirects the user to its data entry screen, while the -Attachments button redirects to its attachments management screen. Finally, the -Actions button allows the user to to directly perform a series of actions on the current document.
| Action | Comments |
|---|---|
Printing |
Triggers the physical printing process of the document. Note that the physical printing of a document requires specific a document type or series. The required settings can be found in section ERP application configuration/ Document types & series of the present manual. |
Send via E-mail |
Auto-composes an E-mail with the customer as the recipient and a PDF-type file as an attachment, displaying the current document's details. Note that, through an appropriate setting of the parameter "Generation method of E-mail document" (MailMergeMode) of the SFALite Configurator, text recording is also possible. |
Reporting
This section describes the reports available in the ESMobile application. These reports are mostly based on local data and are designed to provide managerial & statistical information, regarding the customer list activities. Note that the "validity" of local reports also depends on the frequency of data receipt from the ERP.
My Summary
The dashboard report “My Summary” (My Tools menu) gathers a lot of information about the device’s customer list.
| Page | Comments |
|---|
My Summary
| Yearly summary | The amount of orders, sales & collections for the current and previous year, as well as the change index. It should be noted that, in order for the figures to be comparable, the amount of the previous year does not include the months after the current month. | 
|
|---|---|---|
| Open appointments today | Open appointments of the current date sorted by start time. By focusing on an appointment, the user is immediately redirected to its dashboard screen. | |
| Date transactions | The total number-height of orders & receipts made by the salesperson-user of the device at the current date. When focusing on a specific date, the overview list of individual documents is displayed. |
Customers near me
| Displays, in list format as well as pin on the map, the customers located within a specific distance from the current spot of the device user. The default km radius can be set in the corresponding field of the "Settings" screen (screen: Settings/ Operation profile/ Map). At the same time, by pressing the -Radius button, it is possible to limit or extend the radius through the environment of that screen. Keep in mind that the “Customers near me” screen also allows you to directly call the bulk import appointments process for customers that meet the set km radius.
|

|
|---|
Top performance
| Top products | The top 10 items by sales quantity of the last 12 months. |
|---|---|
| Top customers | The top 10 customers by turnover of the last 12 months. |

|
Open orders
| Orders containing items with an uninvoiced quantity. When focusing on a specific order, the information is analyzed the item level. |
|---|
Sales per month
| Orders & sales of the device’s customer base for the current fiscal year, accompanied by a monthly analysis. | |
|---|---|
 
| |
Task overview
Access to the overview lists of tasks related to the device’s customer base (appointments, orders, collections) is available both via the individual options in the Sales Actions menu and the History page of the customer’s dashboard.Overview lists initially display the tasks of the device salesperson-user, sorted by date. Using the -Sort button, it is possible to change the classification criterion, while using the -Search button, it is possible to use alternative search criteria for the entries. Finally, for the direct distinction of entries in relation to sending them to the ERP, these are marked by a relevant icon ( for Sent and for To Send).


Transactions per day
The “Transactions per day” report (menu: My Tools / Information) provides information on sales & collections made to the customer base of the device with totals per day. Initially, the transactions of the salesperson-user of the device are displayed and using the criterion "Salesperson" it’s also possible to display the transactions made by other users.
| Orders per day | Provides information on the number-quantity-value of orders per day. When focusing on a specific date, the detailed list of documents is displayed. | 
|
|---|---|---|
| Collections by date | Provides information regarding the amount of collections per day, broken down by a payment method (cash, notes). When focusing on a specific date, the detailed list of individual collection receipts is displayed, while focusing on “Note” column of the totals line, the detailed list of individual notes is displayed. |
Yearly comparison
The “Yearly comparison” report (menu: My Tools/ Information) provides static information on the customer base & the items of the device. More specifically, it displays the sales quantity-value per period, for the current and previous year, as well as their deviation %. When focusing on a specific period, an analysis runs per customer & item.


Customers balance
 The “Customers balance” report (menu: My Tools/ Information) provides financial information on the device customer base. More specifically, it displays the current book & commercial balance, the open notes amount and the customer turnover.
Tools & Configuration
Systems integration
This section describes the elements that determine the data to be exchanged and the individual options of the data synchronization process.
Data synchronization scenarios
The ERP application contains a set of product scenarios of data exchange between the SoftOne ERP & ESMobile application.
Data delivery
The data delivery scenarios determine the information sent from the device to the ERP. The value of the RecordState field (value: 0-To Send) constitutes a criterion to filter local database entries that will be included in the relevant package to be imported.
Data download
The data downloading scenarios determine the information sent from the ERP to the device. The criteria for filtering ERP database entries to be included in the relevant package to be exported vary significantly, depending on the entity to which each scenario refers.
Customer base
- The device customer base assignment depends exclusively on the user-customer link. The definition of this link is done through an appropriate setting either of the salesperson field, or the collector field of the Customer entity. From the full customer base of the company, available on the individual devices are the active customers assigned to the salesperson-user of the device.
Item catalogue
- The assignment of the device’s item catalogue depends on the available on mobile field of the Item entity. From the full item list of the company, available on the device are the active items that have this flag enabled. Note that the field that should be used for the “Available in mobile” flag (Item_AvailableInMobile_Field) is designated in a corresponding parameter of the SFALite Configurator.
Appointment
- Assigning appointments to the device mainly depends on the assignment manager field. Out of the total appointments, those available on the device are all open appointments where the assignment manager is the salesperson-user of the device. At the same time, for informational purposes, available on the device are all closed tasks of persons included in the device user’s customer base, regardless of who manages the assignment. Note that the parameters "Day limit / Future appointments" (es.sap_DaysForFutureMobileTasks) and "Day limit / Closed appointments" (es.sap_DaysForCloseMobileTasks) of the SFALite Configurator determine the preferred number of days to be sent from the ERP to the device’s scheduled & completed appointments respectively.
Order
- Available on the device are the order-type sales documents referring to customers who are part of the customer list of the device user and their issue date is within the past period specified in the parameter “Day limit / Documents” (DaysForDocToSendToPDA) of the SFALite Configurator.
Cash collection
- Available on the device are the cash transaction documents of customer collection type, referring to customers who are part of the customer list of the device user and the of their issue date is within the past period specified in the parameter “Day limit / Documents” (DaysForDocToSendToPDA) of the SFALite Configurator.
Attached documents
- Available on the device are the relevant URL-type documents, associated with entries downloaded to the device that refer to the entities: Customer, Item, Appointment & Document.
Sales statistics
- Available on the device are the monthly aggregated sales data (quantity & turnover) for the current and previous year.
Data synchronization actions
From the devices it is possible to directly connect and communicate with the ERP, both to download updates and send data. The individual processes for communication with the ERP can be accessed via separate options in the ESMobile application main menu (menu: Sync).
Delivery
The process of sending data ensures that the ERP is updated with all the latest entries and interventions made by the device.
At the end of the data download process, a notification message pops up regarding the total duration of the process execution and the amount of data sent. Otherwise, in case the data delivery process is not feasible, a message that explains the error appears.
Download
The data download process updates the device with the updated data from the ERP application (persons, items catalogue, new appointments to be executed, etc.)
At the end of the data download process, a notification message pops up regarding the total duration of the process execution and the amount of data received. In case the data download process is not feasible, a message explaining the error appears.
Data synchronization
The data synchronization process first activates the process of data delivery to the ERP followed immediately by the downloading of the updated ERP application data to the device.. When it comes to reporting regarding the duration of the execution process and the data exchange, the same applies as described above for the individual execution of sub-processes.
Initialization
When the ESMobile application is first installed on a device and when the user logs in to the application, the data initialization process is also automatically activated. Thereafter, data initialization is required only in cases when, for any reason, we wish to recreate the database (e.g. change of the device salesperson-user), or in case of a major upgrade to the ESMobile application version.
In any case, the data initialization process first activates the data delivery to the ERP and then proceeds with the deletion and recreation of the device’s database. Recreating the database ensures that it includes the last updated ERP application data. At the end of data initialization process, a notification message regarding the total duration of its execution appears. Otherwise, if for any reason the initialization process is not feasible, a message explaining the error appears.
Receive photos
Via the photo receipt process, it is possible to download the image files of the item catalogue from the ERP into device folder _ProductImages. At the end of this process, a notification message pops up regarding the total duration of the process execution and the amount of data received. Additionally, in case the photo receiving process fails for some reason, a message including the cause of the error appears.
Attached documents


Access to the full, regardless of entity, attached documents management list is provided via the “Attached documents” option of the “Sync” menu. Furthermore, by pressing the -Attached documents button of an entity’s dashboard screen (e.g. Item entity), a list of all attached documents related to the selected entry appears. Please note here that only the relevant URL-type documents are available on the device. By focusing on a specific entry of the attached documents management screen, the user is redirected to the respective attachment overview screen.
ESMobile device
This section presents the operational configuration parameters of the ESMobile device, as well as a series of auxiliary & informative tools available to the mobile user.
Settings
User preferences
The Operation profile area of the Settings screen allows the user to set up several options related to the interface configuration of the ESMobile application.
- Language. When you first install the ESMobile application on a device, the Greek language is automatically selected as the language. Then, via the “Application language” option of the “Settings” screen, the device user can select their language of preference.
- Biometric authentication. Selecting the biometric authentication option of the “Settings” screen (menu: Settings/ Operation profile), allows the device user to be identified either by using a fingerprint, or by using a personal Identification code (PIN). Note that, in order to allow for biometric identification, fingerprint scanning should be supported by the device, or alternatively, a personal Identification code (PIN) should have been set.
- Gray scale style. The ability to change the default style of the ESMobile application. This setting affects the menu, lists, management screens and generally the entire user interface of the application. This feature activation will be visible after restarting the ESMobile application.
- Map. The ability to configure elements that affect the function of the “Calendar” screen (Maximum number of pins) and the “Customers near me” screen (Search radius).

Reporting
- Version info. From the corresponding “Settings” screen option, information is available regarding the version number of all the individual elements that make up the ESMobile application. It is also possible to display information around key application configuration tables (application parameters, document types & task types). Finally, there is direct access to the application user manual.
- Device ID. The General area of the Settings screen provides information about the unique identification code of a device. This code is generated automatically by the system after the ESMobile application is first installed on the device. By focusing on this option, the user can send the code via e-mail.
- Sync information. In the Debug files area of the Settings screen, the user can find information on the data synchronization procedures. This information may prove useful in cases of communication problems with the ERP. Via the "Sending" option, the information files can be sent via e-mail, while by using the "Delete" option, the information files are deleted.
Physical printing settings
- 128x167px128x134pxPrinter. The “Printer” option of the “Settings” screen allows the device user to enable the physical printing feature via the ESMobile application interface. Note that, a prerequisite for enabling a printer through the ESMobile application is that the printer device has firstly been recognized by the mobile device and that the two devices are paired. The printers that are compatible with the ESMobile application per platform are:
- -iOS platform. The compatible printers are Bixolon SPP-R400 or SPP-R410 and Zebra ZQ520, as well as AirPrint-type printers.
- -Android platform. The compatible printers are Bixolon SPP-R410, Zebra ZQ520 or ZQ521.
- Print form. The ESMobile application comes with document print form samples that are compatible with all printers supported by the application. These samples concern:
- quantitative/value-related sales document (form: Document_4inch)
- collection note (form: Collection_4inch)
Import & Export Settings
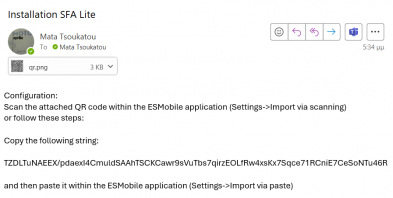
In order to facilitate the process of setting up the installation devices, it is now possible to update the settings of an application by scanning a QR code. Alternatively, it is possible to update the settings by copying and pasting a special text format. This feature can be used by following the steps below.
First device
Install the ESMobile application on a device. You will be redirected to the “Settings” screen, where you adjust the settings available according to the preferred values and from the “Settings Import/Export” section, call one of the actions for QR Code generation or Settings sharing. On the screen that appears, select the settings to be exported and by pressing the "OK" button, the corresponding settings file is automatically generated.


Next device
Install the ESMobile application on another device. You will be redirected to the “Settings” screen and from the “Settings Import/Export” section call one of the actions, Import via scanning or Import via paste, using the “generated” settings file from the first device.
This phase completes the setup process of the next device and the user is ready to start using the ESMobile application. The same process is followed for setting up all devices in an installation.
ERP application configuration
This section highlights, in order to receive the attention required, the specific parts of the configuration performed in the ERP that contribute significantly to the proper function of the ESMobile application.
Mobile user
The mobile user must be opened as a system user and salesperson. These two entities should be linked to each other through the web account entity.
Salesperson-User

- User The series of order (“Sales” section) and Collection-type documents (“Customer cash registers” section) must be obligatorily declared. This can be done in the “Series rights per branch” area of the User entity. Note that for the Order & Collection document types, a different series per user must be declared.
- Salesperson. Must be obligatorily characterized as Salesperson. This can be done in the “Additional properties” area of the Person entity. It is also mandatory to set its connection to the user (“User” field).
WEB account

In addition to the main identification details of the device user (code, password, master e-mail), declaring the account association details with the web service 201- Soft1 SFA is required.
- User-Company-Branches. The user-company-branches with which the user logs in to the ERP.
- Representative. The salesperson-user link field. The representative value must be obligatorily declared (“Section” field) and the preferred salesperson must be selected (“Representative” field). Please note that the user with whom the salesperson selected is linked, should match the user declared as the login user.
Main entities
In relation to the main entities, the minimum required is customer-salesperson link (Client entity) and a definition of the items available on mobile (Item entity). The rest of this section highlights other configuration points for the basic entities that play an important role in the proper functioning of the ESMobile application, so that they can be given the necessary attention.
Customer base
- Salesperson. To assign the device’s customer base, a corresponding customer-salesperson link is required.
- Address data. To display customer addresses on the map, address information regarding longitude & latitude must be filled in properly.
- Pricing policy data. To enable the pricing policy for the current pricelist, the user must properly declare the details that make up the prices-discounts (agreement, customer-item invoicing category etc.) Note that the ESMobile application has some limitations when it comes to differentiating prices-discounts based on the pricing policy. A full description of the local pricelist functionalities is available in section Order/ Invoicing policy/ Local pricelist of the present manual.
- Warning message. Display a warning message regarding the customer when adding a new document.
- Log data. The "Days limit / Documents" (DaysForDocToSendToPDA) parameter of the SFALite Configurator essentially determines the past period for which we wish the documents (orders & collections) to appear on the device. The period should be determined to provide the user with the necessary information, but without burdening the local database volume with unnecessary log information.
Inventory items
- Available on mobiles. In order for an item to be available on the device, it must be marked as “Available on mobile”. Note that the field we wish to use for the “Available on mobile” property can be declared in the “Available on mobile” (Item_AvailableInMobile_Field) parameter of the SFALite Configurator.
- Barcode. In order to be able to select an item in a document via barcode, the specific barcode must be declared in the corresponding field of the item's screen.
- Prices & Discounts. Out of all the alternative prices & discounts of the item, the ESMobile application only supports: Price 01, Price 03, Price 03 and Discount %-1.
- Measurement units. Of the total MUs of the item, the ESMobile application only supports: Main MU, MU, Sales & Alternative MU-2. In order to be able to declare the quantity in Sales MU & Alternative MU-2, their relationship details with the Main MU must be filled in. Keep in mind that, regardless of the setting in the "Strict relationship" field, quantity conversion always works both ways.
- Quantity decimals. To enable the differentiation of decimal points per measurement unit, the preferred decimals number must be specified at the relevant field of Measurement unit entity.
- Log data. The “Day limit / Entries” (DaysForTradeAccountEntries) of the SFALite Configurator parameter determines essentially the past period of time for which we wish the item movements (sales & returns) to appear on the device. The period should be determined to provide the user with the necessary information, but without burdening the local database volume with unnecessary log information.
Notes
- Entry type. To ensure the seamless operation of the data delivery process, the "Notes / Entry type" (Collection_Note_Type) parameter of the SFALite Configurator should state the desired value.
- Series. To ensure the seamless operation of the data delivery process, the "Notes / Series" (Collection_Note_Series) parameter of the SFALite Configurator should state the preferred value.
Document types & series
A prerequisite for the document management of the ESMobile application is the definition, per user & document type, of the preferred document series. The assignment process of document series per salesperson-user is described in the ERP application configuration/ Device user/ Salesperson-User section of this manual.
In this section you can find all the parts of the document type-series configuration that play an integral part in the proper function of the ESMobile application, to ensure the required attention.
ERP features
This section highlights the properties of the ERP document type-series that affect the operation of the ESMobile application. These features are configured through the respective ERP application entity management screens.
Sales-Parameters | |
|---|---|
| Prices in the MU | The user can determine whether the values are expressed in the Main MU (“Main” option) or the Sales MU (“Pricing” option). Keep in mind that the parameter also determines whether the quantity in Main MU or in Sales MU participates in the calculation of the document value. |
| Strict application of zone values | Regardless of the setting made in this parameter, the ESMobile application works with the logic of strict application. |
| Discount application | Determines whether the calculation of discounts of 1-2-3 of the document line is cumulative or successive. |
Sales-Document type | |
| Behavior | Of the total ERP sales document types, available in the ESMobile application is the 201-Sales order. |
| Uses value | The value specified should be Wholesale. |
| Pricing policies | In order to activate the functionality of the local pricelist, the value specified should be Trade account agreement. |
| Agreement | To activate the functionality of local pricelist use, the value should be empty. |
Collections-Document type | |
| Behavior | Of the total ERP types of cash register transaction documents, available in the ESMobile application is 101-Collection from customer. |
Document series | |
| Automatic numbering | Given that the document numbering is given when the document is added in the ESMobile application, the value specified should be Yes. |
| Code composition | The value specified should be Yes. |
| Manual series | The value specified should be Yes. |
| Strict numbering | In order to ensure the smooth operation of the data delivery process, the value specified should be No. |
| Print/ Method | Determines whether the functionality of document printing is automatically activated, upon document save. |
| Print/ Copies | Determines the amount of copies when printing a document from the ESMobile application. |
| Branch | It should be populated. |
ESMobile features
This section lists all the features of the document type-series ESMobile regardless of whether they are adjustable or not. The behavior of the properties that can be configured can be defined via the SFALite Configurator interface.
Sales-Document type | |
|---|---|
| Measurement unit type | It determines which of the alternative measurement units of the item will act as default on the document line and has the value “1-Sales MU”. The parameter cannot be modified. |
| Stock level check | Defines whether, on inserting an item in the document, the check of its stock availability is automatically activated. The available values are: 0-No, 1-Warning and 2-Prohibition. |
| Same item behavior | Determines the effect of adding an already existing item to the document. The available values are:
|
| Pricing zone | It determines which of the alternative sales prices of the item will act as default on the document line and has value “1-Wholesale”. Works in conjunction with the customer zone price, while respecting the rule that stipulates the customer pricing zone overrides document type one, except in case the customer does not have a specific pricing zone. The parameter cannot be modified. |
| Online invoicing policy | Determines whether, upon saving the document, the online invoicing policy action is activated automatically. |
| Print command | The ESMobile app name of the file regarding the document print command. The parameter cannot be modified. |
| Signature | Not available in the SFALite application. |
Collections-Document type | |
| Print command | The ESMobile app name of the file regarding the document print command. The parameter cannot be modified. |
| Signature | Not available in the SFALite application. |
SFALite Configurator

The SFALite Configurator screen displays parameters that are specific to the ESMobile application. Before proceeding to the first installation of the ESMobile application on a device, the parameters’ default value must be checked and configuration might be needed based on the installation needs. This process is completed in step 6-Overview, where the set of parameters is displayed, with the ones that differ to the default value marked in bold. From this point on, pressing the "Confirm & Save" button completes the configuration process. Keep in mind that with the “Restore all” button, all parameters can be reset to the default settings.
Attention
Any change to the SFALite Configurator settings becomes available on the device only via the data initialization process.
A description of the parameters functionality, as well as the available values per parameter is provided in the sub-sections of the present manual. In this section and for the immediate overview of all parameters to be possible, a complete list of them can be found.
| Settings
|
Default value |
|---|
General

| System administrator e-mail | ||
|---|---|---|
| The email address where application error messages are sent. (Administrator_Email) | ||
| Google maps key | ||
| The key to use Google's map service. Specific to the-Android platform. (Googlekey)
|
||
| Generating Document E-mails | PDF/Speech | |
Configures the behavior of the document delivery via E-mail process. The available options are: (MailMergeMode)
|
||
| Phone call application | ||
| The application via which the phone call is made. The available options are teams & telephone. (Uri_Scheme_Type) | ||
| Price list / Customer Condition | Customer Invoicing category | |
| The customer grouping field that is used as a condition to define invoicing policy data. The available options are: 23-Customer commercial category, 26-Customer invoicing category, 108-Customer group. (PriceList_TradeAccount_Dim) | ||
| Pricelist / Item Condition | Pricing category of Item | |
| The grouping field of the item used as a condition for defining pricing policy data. The available options are: 23-Item commercial category, 26-Item invoicing category, 108-Item group. (PriceList_Item_Dim) | ||
| Day limit / Documents | 60 | |
| The preferred number of days to send from the ERP to the device of the order and collection-type documents. (DaysForDocToSendToPDA) | ||
| Day limit / Customer entries | 60 | |
| The preferred number of days to send from the ERP to the device of the sales entries & sales return. (DaysForTradeAccountEntries) |
Appointment

| Default series | ||
|---|---|---|
| The suggested Appointment task series. (Appointment_Series) | ||
| Preparation time (minutes) | 30 | |
| The appointment’s default preparation time (minutes). It is exclusively used by the bulk appointment creation processes, as the interval between two meetings. (es.sap_DefaultMinutesToPrepare) | ||
| Usual duration (minutes) | 60 | |
| The default duration of the meeting (minutes). (es.sap_DefaultMinutesToEnd) | ||
| Day limit / Future appointments | 7 | |
| The preferred number of days to send from the ERP to the scheduled appointments device. (es.sap_DaysForFutureMobileTasks) | ||
| Day limit / Closed appointments | 30 | |
| The preferred number of days to send from the ERP to the completed appointments device. (es.sap_DaysForClosedMobileTasks) | ||
| Morning zone / Start | 08:00 | |
| The morning zone starting time. This information is used to define the non-grayed area of the calendar screen. (MorningZoneStartTime) | ||
| Morning zone / End | 17:00 | |
| The morning zone end time. This information is used to define the non-grayed area of the calendar screen. (MorningZoneEndTime) | ||
| Working hours / Start | 08:00 | |
| The start time of working hours. The information is used by the bulk add appointment processes. (StartWorkingTime) | ||
| Working hours / End | 17:00 | |
| The end time of working hours. The information is used by the bulk add appointment processes. (EndWorkingTime) |
Order

| VAT calculation in totals | 1-Yes | |
|---|---|---|
| Calculates the VAT value on the total, per VAT category, net value of the document. (Doc_VatInTotals) | ||
| Rounding method | Away From Zero | |
| The rounding method used in calculating the value fields of the document. (RoundingMethod) | ||
| Online invoicing policy | 1-Yes | |
| Determines whether, upon saving the document, the online invoicing policy application is activated automatically. (1_AutoApplyOnlinePolicy) | ||
| Line grouping field | Group | |
| The document line field used as a line grouping field. (Doc_GroupField) | ||
| Available on mobile | BOOL01 | |
| The item field used as a filtering criterion for items. From the full list of company items, available on mobile are only those the value “Yes” in this field. Available options: The Yes/No user-defined fields of the item. (Ιtem_AvailableInMobile_Field) | ||
| Balance check / Order | 0-No | |
| Determines whether, upon adding an item to the document, the feature of balance exceedance check is also called automatically. The available options are: 0-No, 1-Warning, 2-Prohibition. (1_CheckItemBalance) | ||
| Same item behavior | 0-Addition | |
| Determines the effect of adding an already existing item to the document. The available options are: 0-Addition, 1-New line, 2-Warning, 3-Prohibition. (1_DocLineSameItemBehaviour) |
Order items

| Selection via barcode / Use of camera | 1-Yes | |
|---|---|---|
| Enables the use of the camera as a barcode scanner device. (Barcode_UseCamera) | ||
| Selection via barcode / Keyboard display | 0-No | |
| Displays the keyboard in a barcode scanning area. (Barcode_UseKeyboard) | ||
| Selection via barcode / Auto-display of scan area | 0-No | |
| Automatically displays, upon opening the document, the barcode scanning area. (Doc_AutoOpenBarcodePanel) | ||
| Select from List / Entry limit | 30 | |
| The number of amounts that corresponds to the "Select all" button of the “insert lines list” type screen. (Doc_InvestigateItemLimit) | ||
| Select from List / Quantity | 1 | |
| The default quantity that corresponds to the “Select all” button of the “insert lines list” type screen. (Doc_ItemInvForm_DefaultQty) | ||
| User intervention in fields / Item price | 0-No | |
| The user can intervene to the Unit price field of the document line. (Doc_AllowEditPrice) | ||
| User intervention in fields / Discount-1 % | 0-No | |
| The user can intervene to the % Discount-1 field of the document line. (Doc_AllowEditDiscount1) | ||
| User intervention in fields / Discount-2 % | 0-No | |
| The user can intervene to the % Discount-2 field of the document line. (Doc_AllowEditDiscount2) | ||
| User intervention in fields / Discount-3 % | 1-Yes | |
| The user can intervene to the % Discount-3 field of the document line. (Doc_AllowEditDiscount3) |
Delivery

| Notes / Entry type | ||
|---|---|---|
| The type of receivable note entry. Used by the process of sending data from the mobile application to ERP. (Collection_Note_Type) | ||
| Notes / Series | ||
| The receivable note issuing series. Used by the process of sending data from the mobile application to ERP. (Collection_Note_Series) | ||
| Order / Reason | Reason | |
| The field of the document line used as Reason. Used by the process of sending data from the mobile application to ERP. The available options are: Reasons, Notes, Notes 2. (Doc_Reason_Send_Field) |
Appendix
ESMobile application installation
This appendix describes the process of the ESMobile installation on a mobile device. Keep in mind that before proceeding with the installation process, the following steps must be taken to set up the ERP application.
- Set up the salesperson-user of the device. Detailed instructions are available in the ERP application configuration/ Device user section of the present manual.
- Confirm & Save the parameters of the SFALite Configurator. Detailed instructions are provided in the application ERP Configuration/SFALite Configurator section of this manual
First installation
This section describes the process of the first installation of the ESMobile application on a mobile device. When the ESMobile application is first installed on a device, upon the completion of the installation, the data initialization process is also automatically activated.
Version installation
The ESMobile application can be installed using the Entersoft mPortal tool (https://mportal.entersoft.gr/). By entering the login credentials for the toll (code, password of the web account and ERP serial number), all ESMobile applications appear, grouped by platform & application. Focusing on the SFALite application for the platform of the device on which we want to install (


| Button | Comment | |
|---|---|---|

|
Sharing the version link via E-mail It is possible to either simply display the link ( button) or automatically create an E-mail containing the link ( button). button).
The version is installed by opening the E-mail through the mobile device interface and clicking the link. | |

|
Download | Instant version installation. This method is only available through the mobile device interface. Note that the result of the download varies depending on the mobile device platform.
|
Upon completion of the installation process -regardless of platform & installation method selected- and in order for the application to be ready for use, the salesperson-user is required to log in to the application and perform the data initialization process.
Data initialization
| By clicking on the SFALite application icon, you will see initial messages related to granting the permissions necessary for the proper operation of the application (location sharing, notification sharing, etc.) and then the application login screen (user name-password & serial number) appears. Keep in mind that, especially on the -Android platform and in order to be able to automatically update the ESMobile application, the permission to install "unknown" applications should also be granted. Finally, by pressing the "Login" button, the user is identified -based on the web account information- and the process of data initialization is called. At this point, the installation process of the ESMobile application is completed.
|

|
|---|
Note that
In order to facilitate the process of setting up the installation devices, it is now possible to update the settings of an application by scanning a QR code. Detailed instructions are provided in the Tools & Settings/ ESMobile device/ Import & Export Settings of this manual section
Upgrading the ESMobile application
This section describes the process of automatically upgrading the ESMobile application to the latest version. The automatic upgrade process is enabled either upon logging in to the ESMobile application, or by calling through the ESMobile application interface any of the actions taken to download data from the ERP (download, sync, initialization).
In any case, upon calling the action, a "compatibility" check is run between the version installed on the mobile device and the latest version of the application and in case of incompatibility, a similar notification message is displayed to the user. Pressing the "Upgrade now" button starts the process of immediate version installation as described above in section first installation. Note that, in case of detection in the local database to be sent, the upgrade button becomes unavailable and, in its place, the "Send data" button appears. Upon successful completion of the data delivery process, the upgrade button becomes available again.


